Hello and welcome back to the Vandemonian Homesteader. I hope that life has been treating you well.
As I promised in my last post, I plan to provide an update on my recent activities and the progress I’ve made over the past few months. To be honest, there has been a lot going on during this time, and I decided instead of giving you a laundry list of everything that was done, I thought it would be better if I just touched on some of the bigger projects I’ve been working on and share what I will be hoping to achieve before the end of the year.
And it’s probably worth mentioning that, as an extra bonus, the 23rd of August marked the 3rd year anniversary of The Vandemonian Homesteader. While there was no large party or celebratory post for this occasion, unfortunately, I was too busy rushing from one job to another. I did, however, find time to have a quiet drink and reflect on the past few years, and all I have managed to achieve during that time. Yet, as great as it can be to reminisce, I will not get bogged down by that now; instead, I will leave that for a larger milestone. Currently, I have a shed to make habitable and a post to write.
So what have I been up to?
These past few months have been very busy, challenging and incredibly educational. At the beginning of this year when I was handed over the keys to the completed shed, I remember thinking that there was a lot of work coming my way, and while I wasn’t wrong, I had no idea how much I actually had to do, and to be honest, in no way did I expect the learning curve to be as steep as it was.
Since getting the keys, I have been working like the devil himself, turning what was originally a 9x6m shed into a basic but comfortable home or cabin. However, before I could move in, I had to take care of some things. I may be moving out into the bush and living off grid, but I’m not going to be attempting to reenact the day-to-day life of a pioneering settler of yesteryear. Although I appreciate some of the older ways things were done, I also enjoy the comforts that a modern home has to offer. After discussing with my partner what we both felt were non-negotiables, I compiled a list. And to be honest, I’m pretty confident most others would have settled on the same points. Heating, power, running water, both hot and cold and a waste management system that didn’t involve an outhouse.
With that list in mind, I began working to make it all happen.
Power
The solution to this was straightforward and one of the easier goals to meet. For as long as I have had the dream of going off-grid, I have known that solar energy would play a significant part in making it happen.
Thankfully, getting a solar generator installed was a painless experience. I called several companies, received some quotes, and found one that I liked, and we went from there. In fact, in my previous post, I shared some thoughts on questions to ask and points to consider when shopping for a solar generator. You can find that post here.
In a couple of months, the kit was installed, and I will never forget the day I got the text saying that it was complete and operating. I received the text during the day while I was at work, and as soon as I knocked off, I drove all the way out to the block, arriving late in the evening, turned all the lights on and stood there in awe at the fact that we now had power in what was previously a remote dark shed. It seems daft to think I got all excited about a light being turned on, but standing at the bottom of the driveway and seeing the place lit up like a Christmas tree was a special moment for me, as it meant I had completed another major step towards completing my goals.

Now that the shed had power, I kicked things up a notch and started living out there on the weekends, returning to the city for my 9-to-5. Each Friday, once I had knocked off work, I raced home, packed the car, and Natasha and I would drive out to the block, only to return on Sunday evening, ready to repeat the process.
Having access to electricity meant I could use more tools than just the battery-powered ones I had been using; it also allowed me to work longer into the evening, which was a massive bonus as the sun was beginning to set earlier with the transition from summer to autumn.
Water
At this point, it was the end of April, and I had managed to secure a good deal on a water pump, tank, and filter. However, before they arrived, I had to prepare for their delivery by clearing and levelling a space for the tank to sit. Being one of the last major outdoor tasks left to complete, I wanted to finish it before winter arrived, so I could get a good start on collecting rainwater.
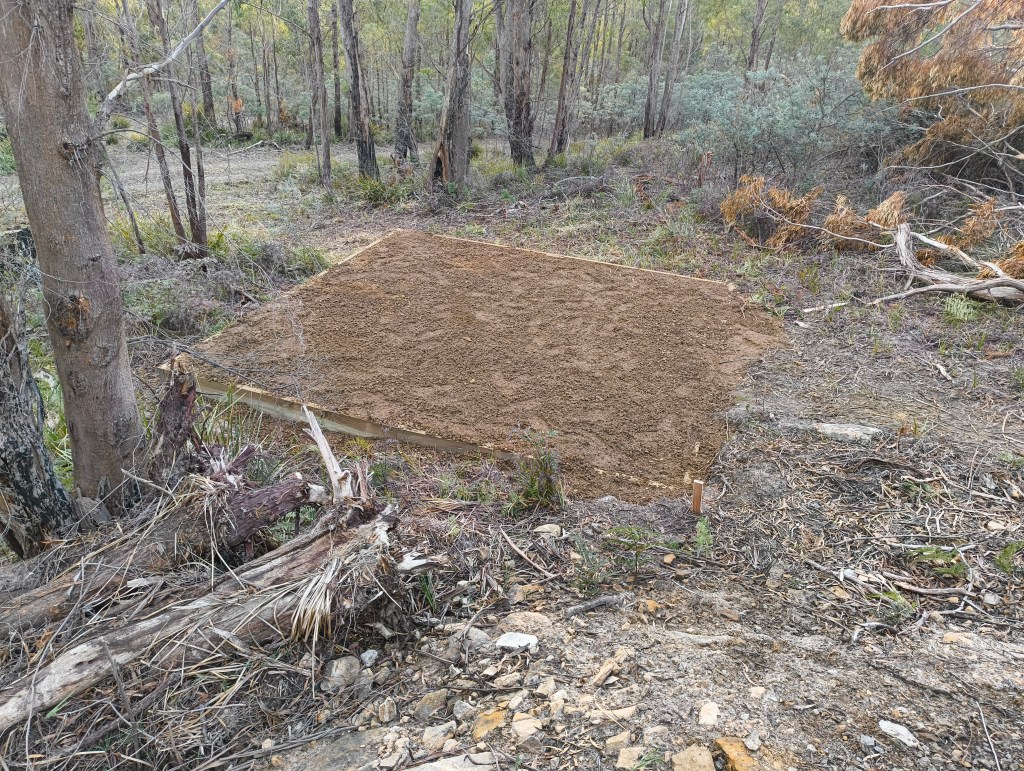
I settled on a location just off to the side of the shed and staked out a 4 m x 4 m space for the tank pad. The site had a slight slope to it, so I would need to dig out one half and reinforce and raise the other.
I spent some time wandering the property with a wheelbarrow, collecting any large rocks that I could find and lift. I would use the rocks along the lower side of the tank pad to help raise and level the site. As more rocks were added, I reinforced them with concrete and rebar.
The tank itself, when empty, weighed 400kg and could hold 24000 litres. I had always been taught that 1 litre of water weighs roughly 1kg, which meant that when full, the tank would have a total weight of 24400kg. Because of this, the pad, in particular the lower half that I was raising, needed to be strong enough to hold that weight. The last thing I wanted was to go outside one day and find that the pad had given out, and the tank, along with all my water, was gone.
Eventually, I had created a small rock wall that ran along the lower corner of the pad, matching the height of the opposite side. When all sides were level, I constructed a 4x4m frame out of treated sleepers and placed it on top of the pad to serve as a framework to contain the various rocks and gravel needed to fill in the interior of the pad.
In hindsight, although I gained a lot from this project, I wish I had hired a local contractor to do it for me. As I was doing it with hand tools, the process took a considerable amount of time. If I had hired a contractor, he probably would have completed the entire job in a couple of days, not the two months it took me. Don’t get me wrong, I enjoyed the process, and Gods was great exercise. However, the entire experience reminded me that, as great as it is to save money and do it yourself, sometimes it doesn’t hurt to spend money, especially if the person you’re paying has an excavator and a truck.

After spending what felt like countless weekends shovelling and pushing wheelbarrows full of gravel, I finally completed the pad the day before the water tank was due to arrive. On June 2nd, the tank arrived, and in preparation for this day, I had been watching YouTube videos of people moving water tanks using rope, pulleys, and a block and tackle. I don’t have any machinery that I could use to help move it, and most of my friends and family were busy on the weekend of the tank’s delivery. So, I had to find a solution that allowed me to move the tank with as few people as possible, hence the use of pulleys, rope, and block and tackle. Thankfully, my partner had taken the day off to help move it into place, and my father said he would drop in to help as well.

Initially, the plan was to winch the tank uphill until it was positioned next to the pad, where it would then be flipped onto. To finish, we would adjust its final position using the block and tackle. However, we quickly discovered that we could easily push the tank about by ourselves, so we thought we would try our luck rolling it uphill instead. With considerable effort, we managed to do just that, and we pushed it into position. Using some random pieces of wood and a shipping pallet, we created a wedge that would hold it while we prepared the block and tackle and rope to flip it onto the pad. Once flipped, we continued with the block and tackle to position the tank where we wanted it, ensuring the overflow outlet was facing away from the shed.
The following weekend was spent attaching downpipes to the guttering and connecting them all to the water tank so I could finally start collecting rainwater.

Insulation and heating
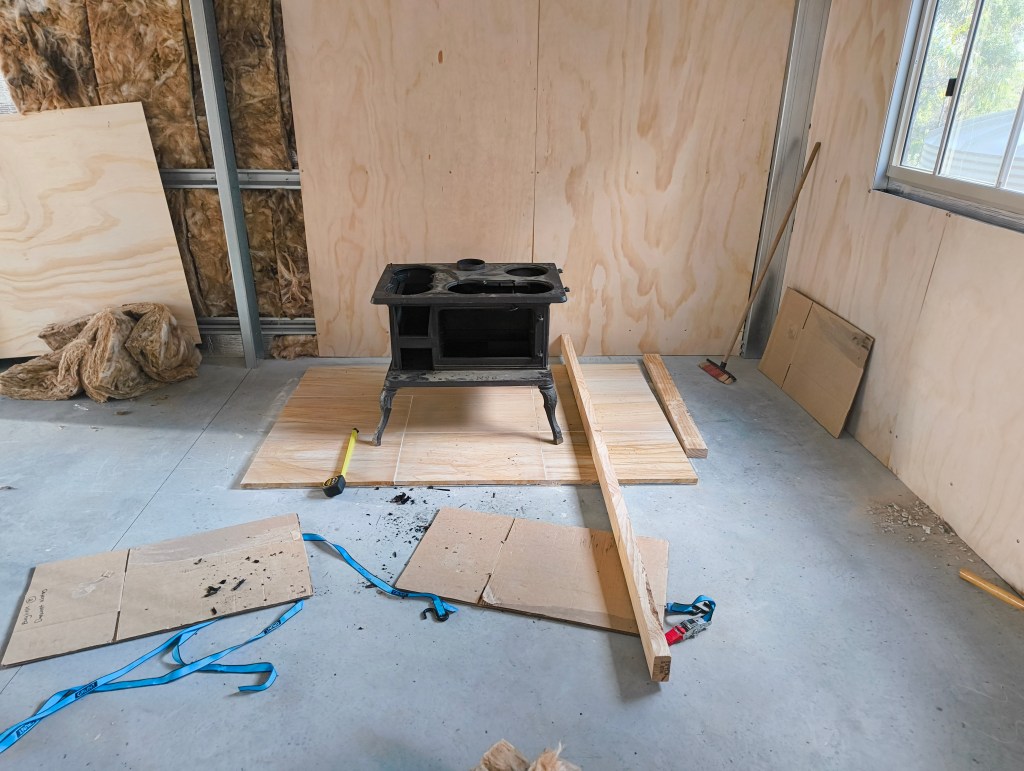
By this stage, winter was well and truly set in, and the nights were long and far too cold to be comfortably spending the night out there, so the next step was to install the wood heater and begin adding insulation to the walls and ceiling. I spent some time researching the government’s requirements for the hearth, heat shield, and placement of the fireplace. There was plenty of advice available online; unfortunately, it was geared more towards North American situations and requirements, rather than those in Australia. Eventually, I came across the National Construction Code website (ncc.abcb.gov.au), which clearly outlined the requirements with easy-to-follow diagrams. As I am doing most of the work on this place myself, I wanted to get it right, particularly the fireplace, so I didn’t have to worry about burning down the shed.
I started by looking for a premade hearth that could be laid out on the floor. Unfortunately, none were available that suited the dimensions of the stove I had. According to what I found on the national construction code website, I had to allow 400mm from the edge of my stove to the edge of the hearth.
So, after getting a sheet of fibre cement, fireplace-rated mortar and a few sandstone pavers, I made one. I also obtained a few strips of hardwood to serve as a trim for the hearth, which I will add later. The combined weight of the cement sheet and pavers means that once the cast iron stove is placed on top, it cannot be moved. Therefore, I didn’t see a need to fix the hearth to the floor.
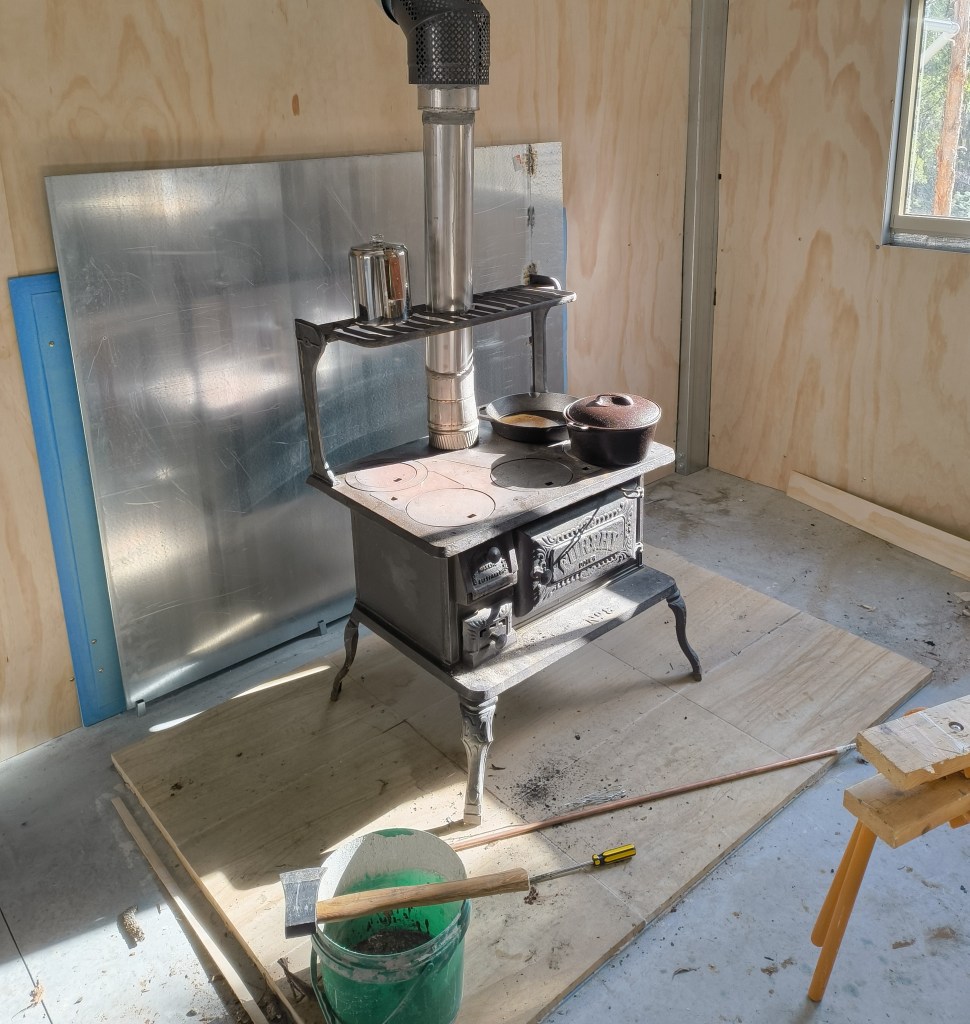
Then there was the issue of the heatshield, because the stove would be placed against the wall, I needed a way to protect the wall behind it, the NCC website recomneded a brick wall but did suggest other methods, like a sheet of metal could be used, provdied there was enough space between the wall and the metal to allow cool air to flow behind it. Not only did I allow for this space and a bit extra, but I also installed a piece of fibre cement sheeting behind the metal, just in case. Later on, I will tidy the space and cover the cement sheeting so it doesn’t stick out as much as it does in the photo below.
Installing the flue was next, and this was a complicated process, getting several lengths of metal pipe to sit still while you try attaching another piece proved to be a challenge, the task was also complicated by the fact that the roof was covered in solar panels so I couldn’t exactly run the flue straight up through the ceiling, instead I had to have it go at a 45° angel through the wall. Ideally, having two people would have made this task easier, but unfortunately, it was just me, so I persevered and eventually got the job done.
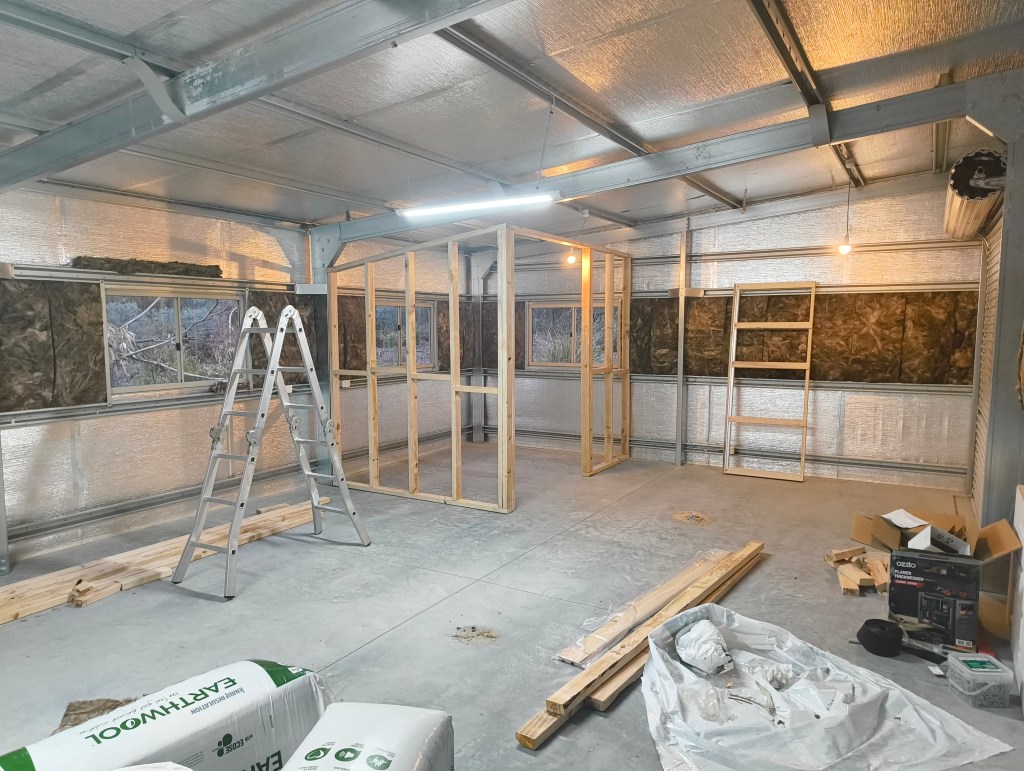
Now that heating had been taken care of and I was able to enjoy the warmth of the fire, I turned my attention to completing the next task. When the shed was built, it originally came with a thin layer of insulation, and as I had learnt first-hand, it didn’t really meet the requirements, so I needed to find an alternative solution. It may have been fine for its original purpose as a shed or workshop, but it was no good for a home.
To solve this, I purchased several bags of insulation from the hardware store and cut it to fit within the metal rails that help to support the walls and ceiling of the shed. I would then panel it all over with a sheet of 3mm plywood. In hindsight, I wish I had gone with the thicker 12mm, as I found the flexibility of the 3mm caused some problems when panelling, especially if it wasn’t completely flat when being screwed to the wall. This flexibility made panelling the ceiling difficult as the board would bend easily. At a later date, I plan to run some thicker timber strips along the joins of the 3mm to help hold them in place while I reposition them so they are flush with the ceiling.
I started out panelling and insulating during the evenings as I left the daylight hours for the larger outside jobs, mainly completing the tank pad. Once the tank pad was complete, the panelling and insulating took centre stage on my to-do list.
With all the plywood on every surface, the shed has taken on the appearance of a cabin, rather than a metal box. And it has quickly become the highlight of my week to leave work on a Friday, head out there and spend the evening by the fire with a nice drink while reading or listening to a podcast once I have completed the day’s work.
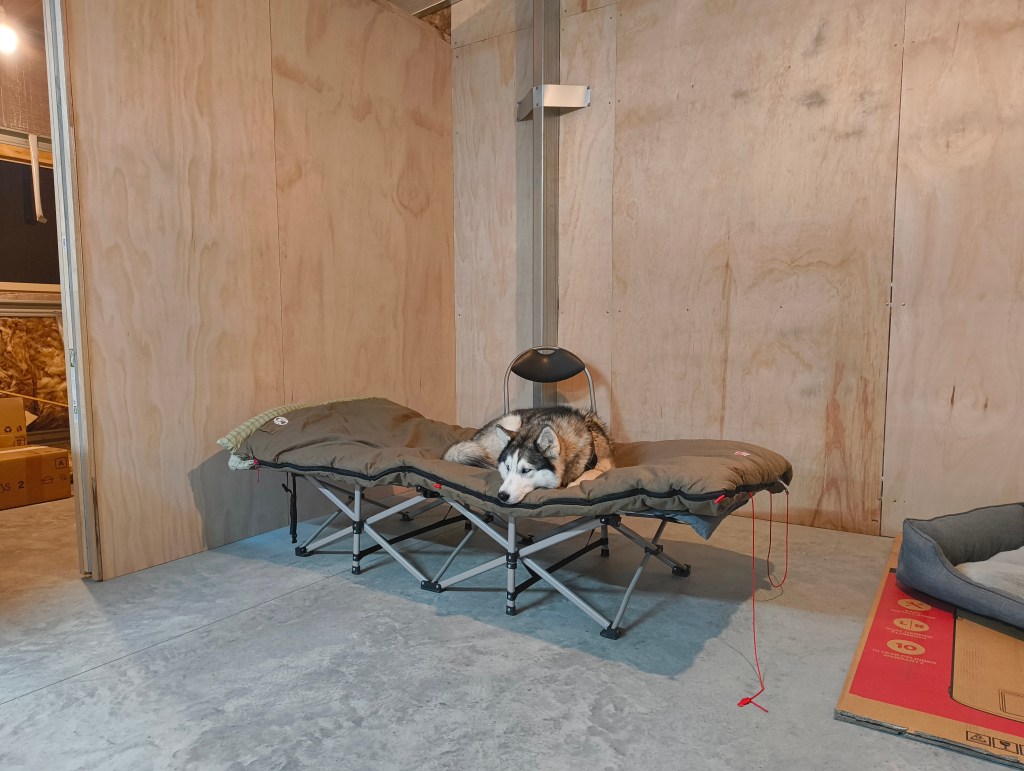
At the time of typing this, I have nearly finished panelling and insulating the walls of the shed, and the new insulation has made a noticeable difference compared to what was originally there in regards to retaining warmth. At a later date, I will cover the “seams” or joins of the plywood with another strip of timber in an attempt to tidy it up.
What’s next on my to-do list?
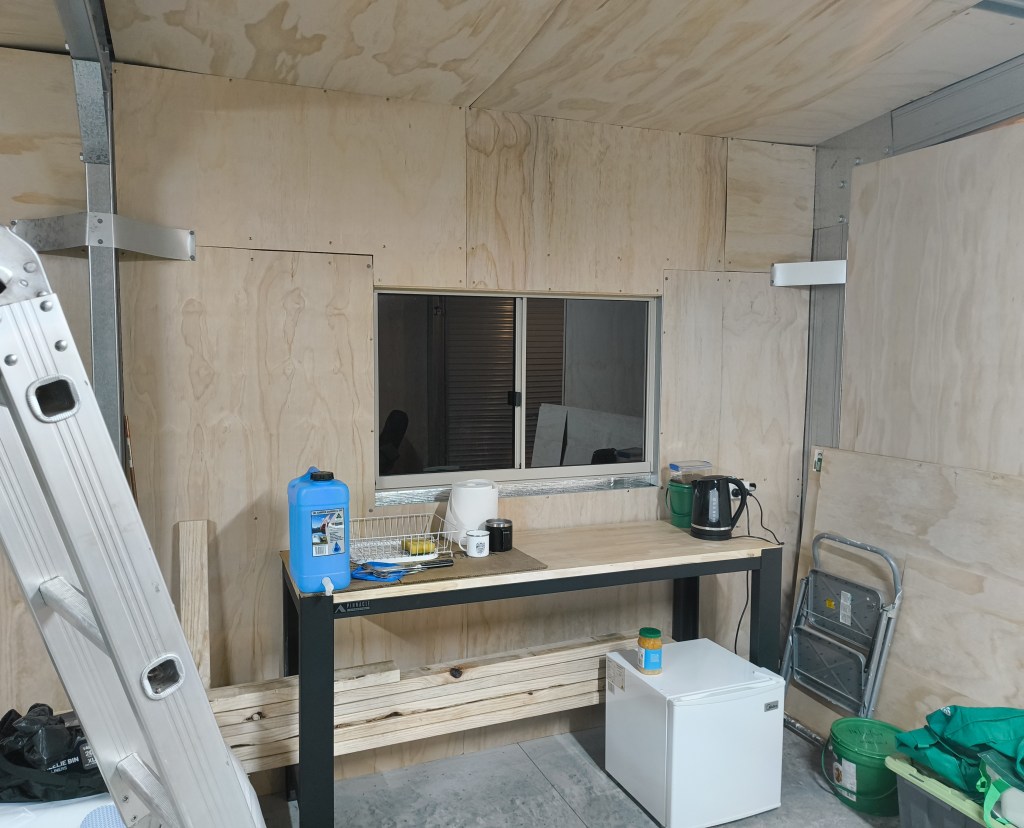
As for what’s next, regarding our list of non-negotiables, running hot and cold water, a working toilet, and waste solutions are the last two items I need to address. Thankfully, I have already had the hot water cylinder installed along with a timer to help control when it heats up. I plan to set its timer so that it only heats water during daylight hours, preventing it from draining my batteries by heating itself up all night. Now, all that’s needed is to install the pump and filter, and to get all the pipes, taps, and shower installed.
I have mentioned in previous posts that I will be using a biogas toilet, and the plan is still the same. However, plumbing the shed will come first, as the digester (the bag that contains bacteria that turns your poop into gas) of the biogas kit requires a significant amount of water. More than I can manage in my current situation. Once the plumbing is done, I can fill it up without having to buy a small portable water tank or an IBC tank.
As for the greywater from the shower and sinks, I am currently considering putting in a drainage field or a series of evaporation pools. I have also considered using a combination of both. In all honesty, I need to do a bit more research on this topic so I can get it right in a way that won’t go screwing up the local environment.
Once that is done out of the way, the next step I have lined up is to install the kitchen and bathroom fixtures and fittings. This will be another big, prolonged job in itself, as I will need to make the kitchen counters, restore the cabinet I will be using as a bathroom vanity and block the roller door opening with a wall to stop drafts and bugs from getting in.
And finally, with the water and waste sorted, I will be able to move in, and with that, I will be bringing another shipping container that I will need to convert into a workshop. I’ve already had a pad made for it, ensuring I have enough room to park a car, with hopefully enough space for another project I have in the works, but more on that later.

What I would have done differently?
As for what I would do differently next time, I have already mentioned a few points, such as using thicker plywood for the walls and ceilings, and hiring a contractor for tasks that are too large for me to manage on my own.
However, aside from those two, I would have to say that buying a pocket sliding door kit for the bathroom from a discount bin (the frame was warped, and it turned into a saga) wasn’t a great idea either, and I wish I had just forked out the money for a new one.
I also probably would have looked at getting a newer more efficient wood stove, the old cast iron Furphy one I have looks and is fantastic, especialy to cook on but it can only take wood that has been cut small enough to fit inside its small fire box, this creates the problem that the fire won’t last all night, so as toasty and warm as I have been going to bed waking up is a different story. I currently hope that once I block and insulate the roller door, I will be able to prevent this by trapping the warmth better overnight, as I would have eliminated what is currently the largest source of drafts.
Other than those points, I would do it all again exactly the same way I have done previously. Yes, it’s been a lot of work, and yes, it’s taking a while to complete, but the knowledge gained along the way is entirely worth it.
Being able to think, tinker and try different solutions to the problems I’m faced with, working with my hands and getting sweaty and dirty as I source materials from a variety of places, is a fantastic and rewarding experience, beaten only by sitting back at the end of the day, tired and sore, enjoying a cold beer while looking over the progress you’ve made.
And on that note, I will wrap things up for the day. To those who have made it this far, thank you. I hope you’ve enjoyed reading about my journey. If you are also on the same homesteading journey, I would be curious to hear what you have tried and, in hindsight, wish you had done differently. Feel free to leave a comment.
As for my next post, given that a fair number of my evenings have been spent at the shed reading, I thought it would be fitting to share some of the books that have inspired me on this path, as well as some I have found helpful as I travel along it. While I currently have no plans to make book reviews a regular feature on this blog, I did feel it would be worthwhile sharing these few, as they have helped me along the way. I’ve narrowed my collection down to four, and it was a tough decision, but the books I have selected are fantastic, and I can’t wait to share them with you. Please stay tuned for that.
Until then, thanks again for dropping in. I hope you’ve enjoyed today’s post. Although I haven’t been posting as often as I would like over the past year, I im sure you can see from the above photos that plenty has been going on. And now that the majority of the heavy lifting is done, I have some plans in the works that will allow me to post more diy and hands-on posts, similar to what I have done in the past. After all, there is no point in homesteading if I don’t grow anything.
If you have any tips from your own experiences that you feel are worth sharing, please add them to the comments below, im always curious to hear what others get up to. Until next time, thanks again, and I will catch you later.

Leave a comment