Hello, and welcome back to the Vandemonian homesteader. I hope life has been treating you well.
Since my last post, I have been flat out all over the shop, trying to get as much as I can done so that I can meet my moving goals. There has been everything from window repair to tree felling (before you ask, they are not related) and preparing for winter gardening. Thankfully, I found some time to do a little more brewing. Towards the end of this post, I will give more of an in-depth update on those other topics.
But for now, with the memories of our home-brewed mead fresh in our minds from my last post (if you missed it, feel free to take a look here), let’s continue with some more home brewing and jump straight on into making some hard apple cider.
What is hard apple cider?
Apple cider, also known as hard apple cider, is an alcoholic drink made from fermenting apple juice. Like most other drinks, apple cider can range from sweet to dry and is available in both still and carbonated forms. Herbs and other fruits can also be added to give a different flavour.
Like mead, apple cider is believed to be another beverage that has been around for centuries throughout history, with the earliest records of fermented apple beverages coming from the ancient Greeks and Romans with a drink called Sikera.
However, more recently, the process of apple cultivation and fermentation has been significantly refined to the point where varieties of apples have been grown specifically for cider-making.
And, again, just like mead, as more and more people try home brewing as a hobby, cider is quickly becoming a favourite among home brewers mainly because it can be easily made in smaller batches and by combining different fruit, berries and spices, you can come up with some unique flavour combinations.
Now that we know a little about what we’re making let’s get started.
Equipment needed
Below is a list of the pieces of equipment you will need. Just as last time, when we made mead, I must stress that if anything you use will come into contact with the cider, it must be sanitised.
- Sanitiser (Starsan is a great brand)
- Large stainless-steel pot
- Large funnel
- Large stirring spoon
- 5 ltr demijohn with airlock and rubber bung
- Measuring jug
- Digital/probe thermometer
Ingredients
- 4 ltr of organic apple juice
- 450gm of sugar
- 1 cinnamon stick
- 10 raisins
- 1/2 packet of champagne or wine yeast
Instructions
- Sanitise everything according to the sanitiser directions
- Add the sugar and half (2ltr) of the apple juice into the stainless-steel pot.
- Gently heat the apple juice on low to medium heat, stirring regularly. Don’t allow it to boil; instead, warm it enough so that the sugar dissolves. Once it has dissolved, remove the pot from the heat and set aside.
- Drop the raisins and cinnamon stick into the demijohn. Then, using the funnel, carefully pour the warm apple juice into the demijohn and allow it to sit for 30 minutes, allowing the cinnamon to infuse and cool.
- Pour the remaining apple juice into the demijohn and take its temperature using the probe thermometer.
- When the temperature of the apple mix is between 18-21 degrees Celsius, add the 1/2 packet of yeast.
- Stir or cap and shake the demijohn to mix in and aerate the yeast.
- Insert the rubber bung and airlock filled with water, ensuring it is stuck firmly in place. If everything is done correctly, the airlock will soon begin to bubble. This process can take a few hours or even overnight to begin. This is the beginning of the fermentation process.
- Place the demijohn in a cool, dark place out of direct sunlight and allow it to ferment for 3-4 weeks. Once the airlock has stopped bubbling, the fermentation process is complete, and you are ready to start bottling.
- The bottling process is similar to that of the mead bottling process. However, with apple cider, once it is bottled, it is best to allow it to sit for a few days (roughly a week) before you start to enjoy your hard work, or if you have good self-discipline and willpower, you could allow it age for a bit longer like a month or two. This will help to improve the taste of the finished product.
And there you have it: an easy apple cider recipe. When it comes time to bottle my two batches of mead, I will post another entry covering the process in more detail, so stay tuned for that.
This recipe can be easily doubled or halved, depending on the size of the fermentation vessel or demijohn you decide to use.
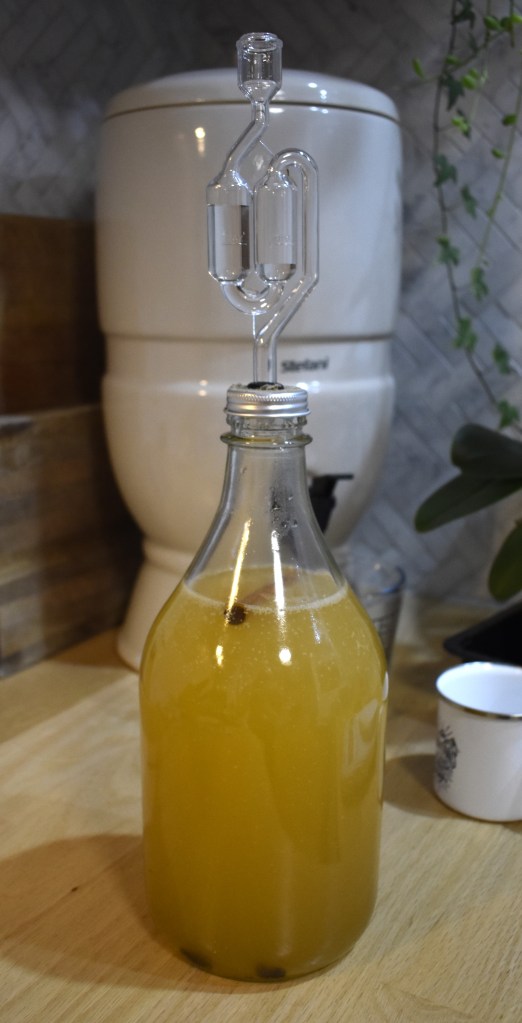
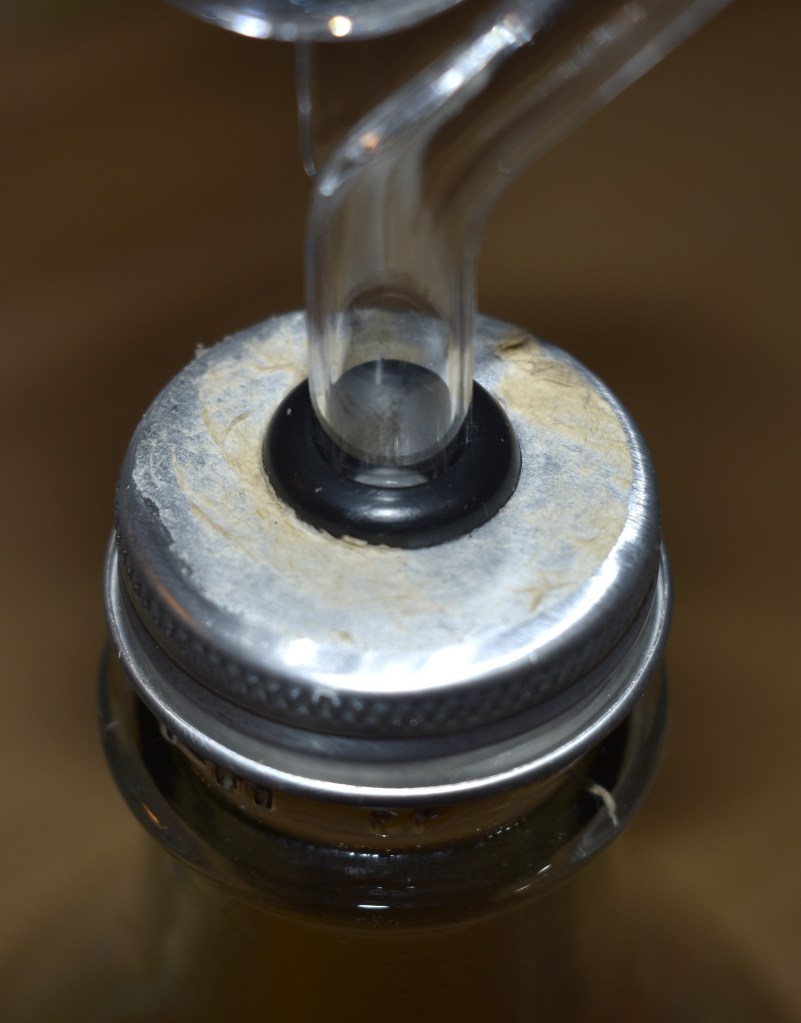
As both of my 5 ltr demijohns were filled with mead, I repurposed a 2.5-litre juice bottle I got from the local farmer’s market. I drilled a hole in its metal screw-on lid and inserted a rubber ring to let me stick an airlock in there and keep it sealed.
As for the recipe I used, I simply halved the one above, and so far, it’s been a week in, and it’s performing well.
In other News
Before I wrap things up for today, I would like to give a quick update on some of the other projects and activities I have going on in the background.
Solar installation
With weather permitting, this week, the solar supplier and electrician will have finished installing the solar kit and wiring up the shed. Over the past few weekends, a lot of time has been spent removing trees and branches to prevent any shade from hitting the soon-to-be-install solar panels. Unfortunately I am loosing that deep in the bush feel I was hoping to keep, but a reliable source of electricity is one of my uncompromisable needs, so the trees had to go.
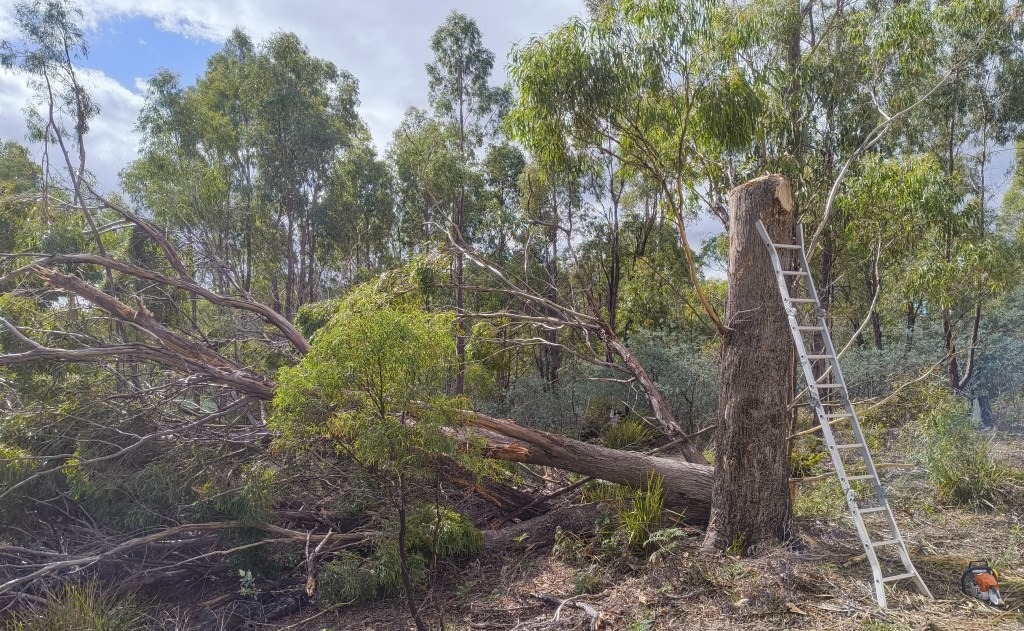
Needless to say, there was plenty of climbing up and down ladders and trees staring at the roof, trying to spot any offending. Thankfully, I now have an unobstructed roof ready for the solar panels to work their magic.
Reviving a section of the backyard garden and dealing with a “pest”

Some of you may recall the garden bed I made last year from treated pine sleepers. It was roughly this time (autumn) last year that I made it, and I filled it with broad beans and bok choy seeds. As with the rest of my garden, it has mostly been neglected since last winter, and the only thing growing in it is some good, healthy weeds.
Still kicking myself for not having planted anything over the spring-summer period, I decided I would at least revive that one bed so I could have something growing for the remaining time I am here.
As it was, I had an afternoon free, so I cleared the bed of weeds and mixed in worms and castings from my worm farm, along with some fresh compost. Once I had it all filled, neat and levelled, I went about sowing seeds of Chinese mustard and daikon radish, both of them growing well from late autumn through winter. These two are also meant to grow well together in the same bed, which I look forward to seeing.
In an attempt to protect my plants from the local native wildlife, I made a small fence out of chicken wire and ran it around the outside of the garden bed.
Unfortunately, Natasha has taken a keen interest in that bed. It probably has something to do with the level of interest I have in weeding, fertilising, and looking at it every day to try to spot seedlings. She is probably just curious as to why im so interested in it, that and to her, the compost smells fantastic.
It started with her finding sections of the wire I had left loose to act as a gate if I needed to get into the garden bed. She would force herself under the wire and dig up the soil in the garden bed, trying to find as much buried compost as possible.
Then, once I had secured all of the wire, she began to launch herself over the fence and resume her hunt for compost. I know huskies are jumpers, but until now, she has never shown any interest in jumping, and I just thought it wasn’t her thing. So I was pretty surprised when I saw her do it for the first time.
As frustrating as the whole process is, I am reminding myself to be thankful because if she can find a way into the garden bed, there is no doubt a wallaby or possum could do the same. So, this attempt to grow some winter crops has evolved into a great little trial-and-error approach to pest management. Something that I would much rather do here on a smaller scale than leave till I get out onto the bush block.
A broken Window
During some high winds we’ve had recently, a window as smashed as a strong just slammed it shut. While calling around local window repair companies, I was shocked to find out it would cost me around 350 dollars to repair a 550 x 750mm single payne window.
Needless to say, I wasn’t going to pay that, so after a bit of reading and a few YouTube tutorials, I made a quick trip to the hardware store and another to a local glass-cutting company, where I was able to get everything I needed to fix it myself for only 60 dollars.
I initially attempted to cut the glass myself from a larger piece I purchased from the builder’s yard at the tip shop. But I broke it, so I decided to save time and money and get the professionals to cut a piece to the size I needed, which allowed me to focus on prepping the window frame and then all I had to do was place the glass in position and putty it in with glaziers putty.
And finally, I purchased a new/old workhorse
Having a vehicle that can take a beating, get you where you need to go and carry a decent-sized load is essential to any would-be homesteader. After all, postage, shipping and delivery costs can be extortionate and so easily avoided if you can just “chuck in on the back”. So, to help with this and brush up on my mechanical skills. I thought it would be worth buying an old second-hand ute. It had to be a reliable and popular brand, so parts are easy to find, and it especially had to be pre-computer everything as I want to be able to fix it and work on it myself as much as possible.
I ended up deciding on an old Toyota 1989 Fj75 Landcruiser ute. And already, this decision is paying off. Its larger tray easily allows me to carry more than I could in my previous ute. As I tinker on it, I’ve already begun improving my engine mechanic skills. Skills that will, in time, become invaluable, especially as I aim to be more self-reliant. So keep your eyes peeled, as sooner or later, the new/old truck is bound to appear in one of the photos I post.
Also, I am trying to think of a name for the old girl, currently, I call it a money pit. But I am looking for something more endearing. If you have any suggestions, please feel free to put them in the comments below.
And with that, that is all I have for you today.
In my next post, I will discuss the process I went through and share my experience in shopping for, deciding on, planning and preparing for a solar power kit. I got a lot out of it, and the Company I dealt with gave some fantastic advice regarding mistakes that many people going off-grid make, myself included.
So please stay tuned for that.
Until then, thanks again for dropping in, I hope you’ve enjoyed it. If you have decided to try brewing any mead or cider, feel free to leave a comment below and tell me how it’s going or what fruit and herb combinations you used. Until next time, thanks again and I will catch you later.

Leave a comment