
A big hello and welcome back to the Vandemonian homesteader! I hope you have all been well and keeping yourselves busy. No doubt you are as aware as I am that it has been a while since my last post. And I do apologise for my unforeseen break. A lot has been going on, and even though I haven’t posted, I have still been busy working toward my goals. Amazingly, I have had some success, but I will go into that more at the end of this post. So please stick around, as there have been some significant changes, and I have a few bits of great news to share. But before I get into that, though, I think it’s only fitting to deliver the post I promised all those weeks ago. So, without further ado, I present, how to store potatoes and make a potato bin.
Why a potato storage bin?
Once dug up, potatoes can last for quite a while, provided they are stored correctly. Unlike many other types of produce, storing potatoes is very easy. All they require is a cool, dark, and dry place, and they will last for several months. For those who remember, one of the raised beds I am about to dismantle is currently full of potatoes, so part of my preparations to dismantle it is to build a container to store the potatoes that will unearthed as I pull it apart and level out the soil.
When thinking about what container to use, I remembered that when I was little, my family had a pair of wooden boxes in the pantry, one for storing potatoes and the other for onions. I believe it was a common practice as I remember it being quite common to see a wooden box or crate tucked in the bottom of someone’s pantry; sometimes, a simple burlap or hessian sack would be used instead of the box. I’m unsure if or when it went out of style, as I don’t see or hear of it being done that often anymore. But honestly, I don’t spend much time snooping around other people’s pantries; I am fairly certain that it would be frowned upon if I did. So I thought a timber box would be the best way to go; it would help keep things neat and organised, and it also means I don’t have to store my spuds in the fridge.
What’s wrong with storing potatoes in the fridge? I hear you ask. Well, as great as the fridge is for some foods, it turns out they are not so great for potatoes. The air inside a fridge has a high level of moisture. And this moisture can cause the potatoes to rot sooner than if kept dry. The cold temperature of the fridge also causes the potato’s starches to turn into sugars, which results in a sweeter-tasting potato; it also makes the spuds turn a darker colour when they are being cooked.
Another thing that I learned while researching this post is that when refrigerated potatoes are cooked, they can create a chemical called acrylamide. Unfortunately, acrylamide is a carcinogen that has links to cancer and can also be found in cigarettes. Thankfully, the levels of acrylamide in chilled spuds are pretty low and not enough to lose sleep over, but still, the less carcinogens you have, the better in my mind,
Ultimately, storing potatoes is a pretty simple task. All you need is somewhere nice and dark, out of direct sunlight, warm, and dry. It also helps if your chosen container is breathable. If a potato can’t breathe, it starts to sweat, introducing moisture that will result in spoilage.
Before sharing how I made my storage bin, I should talk about other methods you could use to store your spuds, just in case you want to try something different.
A Hessian\Burlap sack
The first method I will share is perhaps the most effortless and budget-friendly—the humble hessian sack. You can use one sack by itself or two by placing one inside another. A hessian sack allows you to store your spuds safely from sunlight, and the sack’s fabric will enable them to breathe easily. Another bonus is that, if needed, you can wash the sacks when they get filled with dirt.
Cardboard box
This is another cheap and budget-friendly method. Find a sturdy, unwaxed cardboard box and toss your spuds in. If the box has a lid, then that’s even better. Over time, as the box gets a bit tattered and dirty, all you have to do is replace it with a newer one. The old one could be used in the fire or torn up and added to the compost.
The cardboard box also works well if you want to line it with a hessian sack, as this helps to prevent sunlight from getting into the box. Depending on where and how you get your potatoes, they may even come in a box, which results in one less thing you have to worry about.
Timber box
A quick Google search will reveal a hundred and one different ways to make a storage box or hopper for your potatoes. Suppose you’re not interested in making one yourself. In that case, there is also a wide variety of boxes of crates you could buy brand new or second-hand and repurpose them. I have seen countless old apple crates lined with a hessian sack used for storing potatoes and onions.
Making your own timber storage bin/hopper
Below is a list of the materials and tools I used to make one for myself. I haven’t included a price list as all the materials used are leftovers or salvaged from other projects.
Materials used
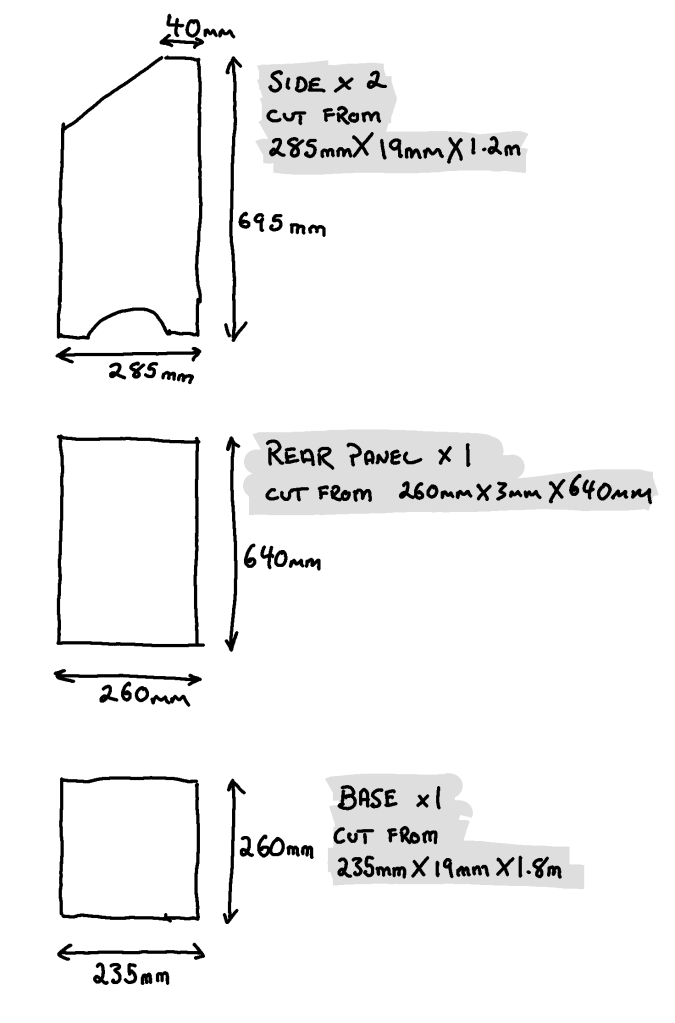
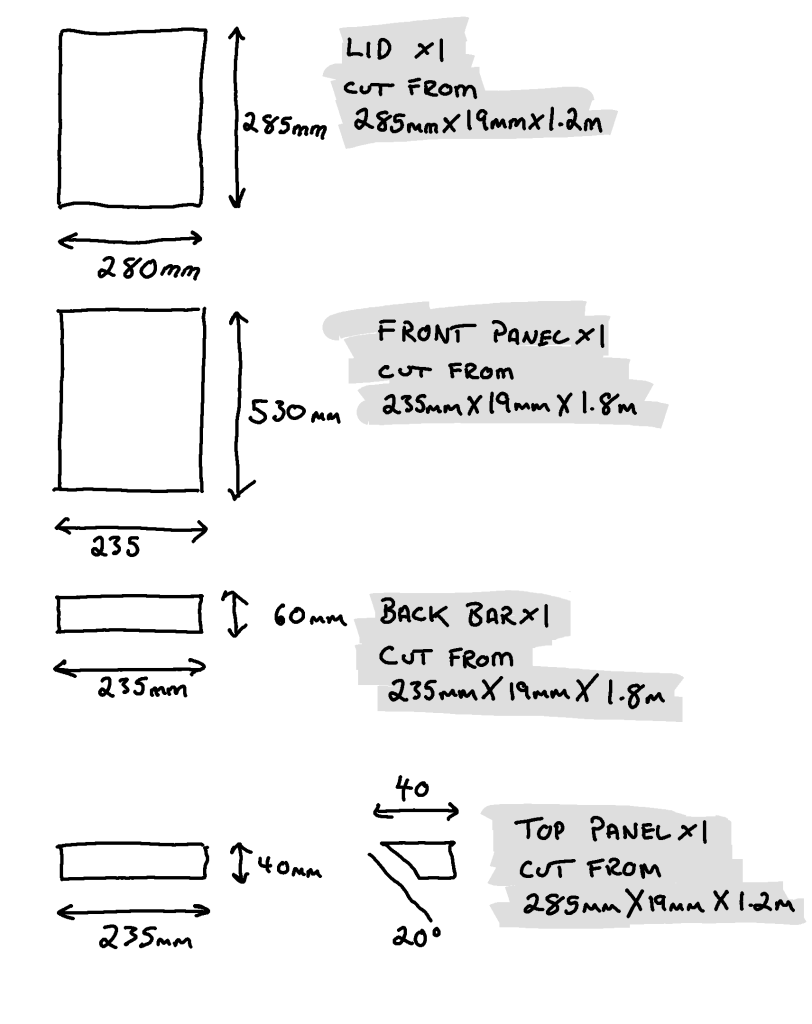
- X1 235mmx19mmx1.8m untreated pine plank.
- X2 285mmx19mmx1.2m untreated pine plank.
- X1 260mmx3mmx640mm plywood
- Wood glue
- 50×2.0 bullet head nails
- 25×1.8mm soft sheet nails
- Pair of small cabinet hinges + screws.
Tools used
- Clamps
- Drill
- Hammer
- Circular saw
- Jigsaw
- Pencil
- Measuring tape
- Square
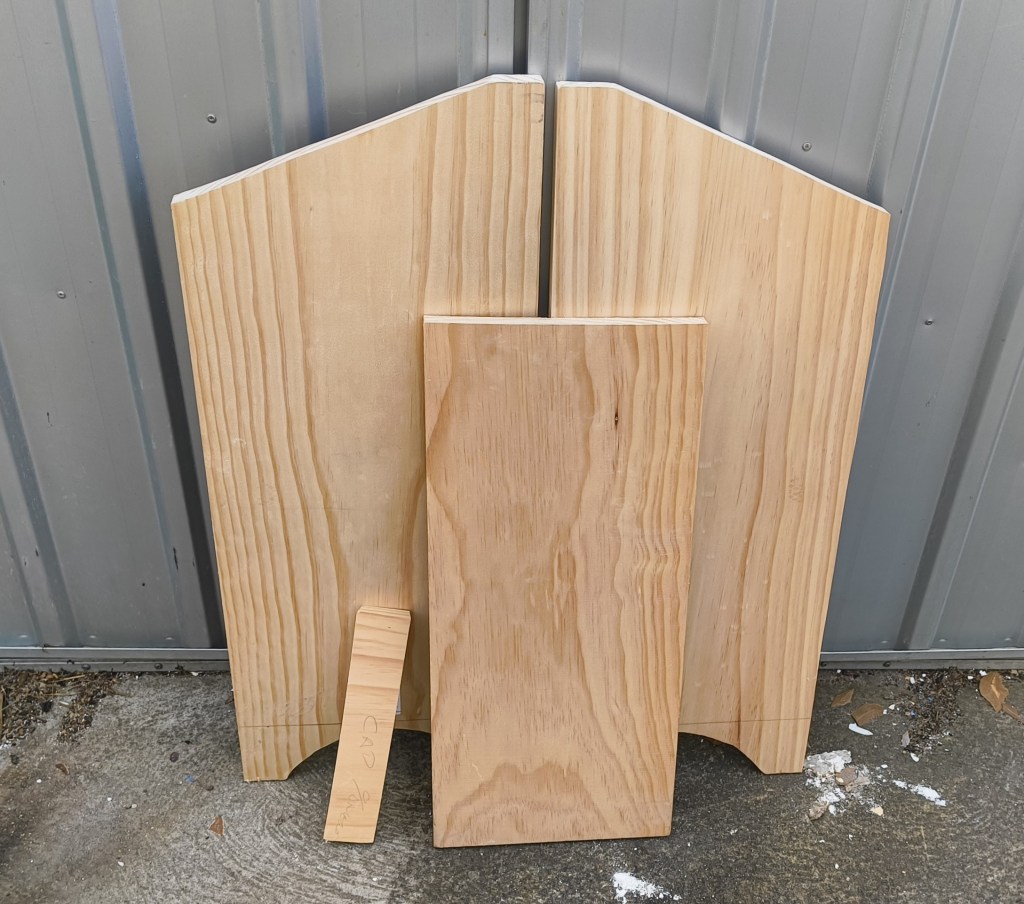
To begin with, I measured and cut out the pieces of timber needed to assemble the box. Other than the back panel, everything was cut from untreated pine planks. I have added below a cutting and measurements list to help demonstrate the measurements I used and which planks I cut them from.
Assembling the bin is pretty straightforward: apply a thin line or wood glue between each join and drive in a few nails to help hold it all in place. Once secure, add some clamps to help keep everything in place while you wait for the glue to dry. Below, I have drawn a diagram illustrating how the parts of the bin can be assembled. One point to mention is that the two side panels should be on the outside, with the front and base panels and the back bar placed between them.
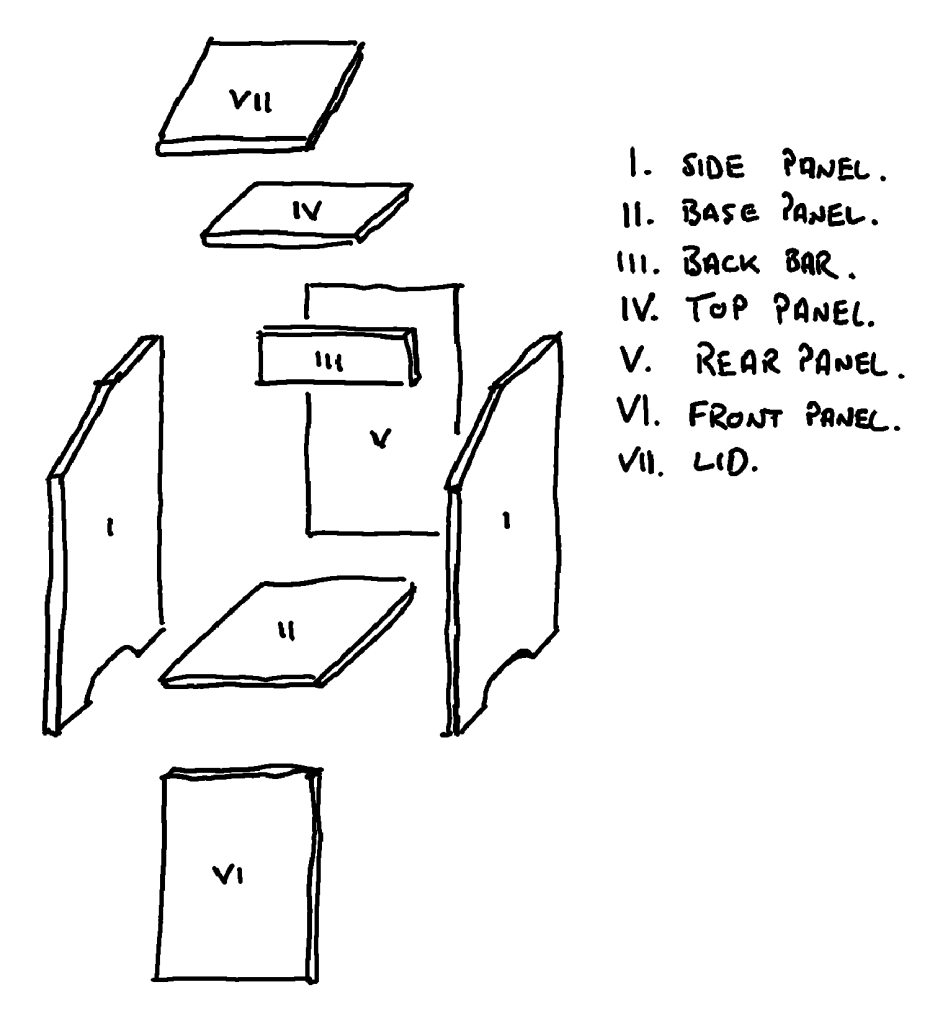
I started by attaching one of the side panels to the front, then the second side panel. After that, I let them sit for a while so the glue could dry.
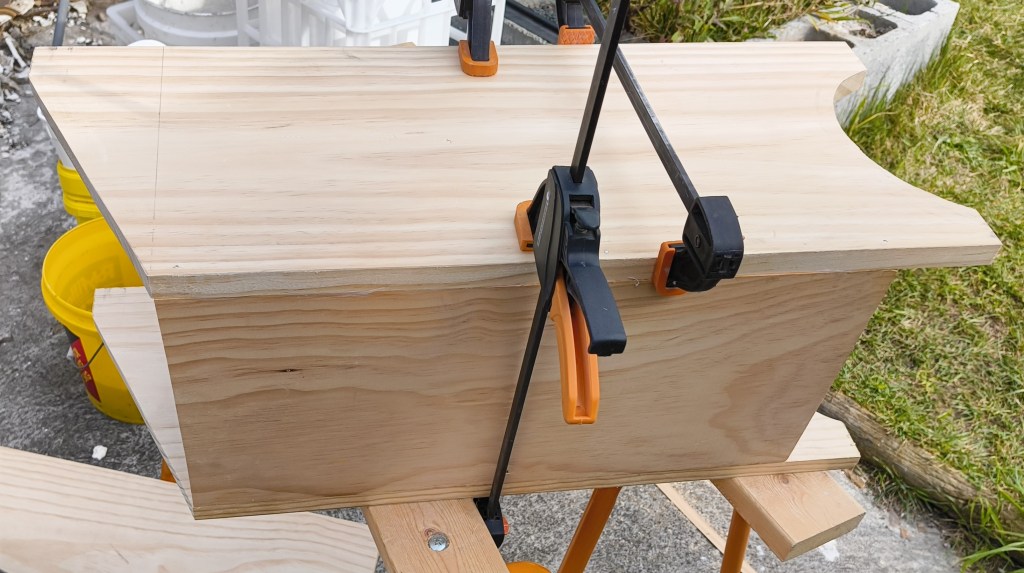
Once the first round of glue had dried, I started again, gluing and nailing the base panel into position and then doing the same for the back bar. And like before, I clamped them up and allowed the glue to dry.
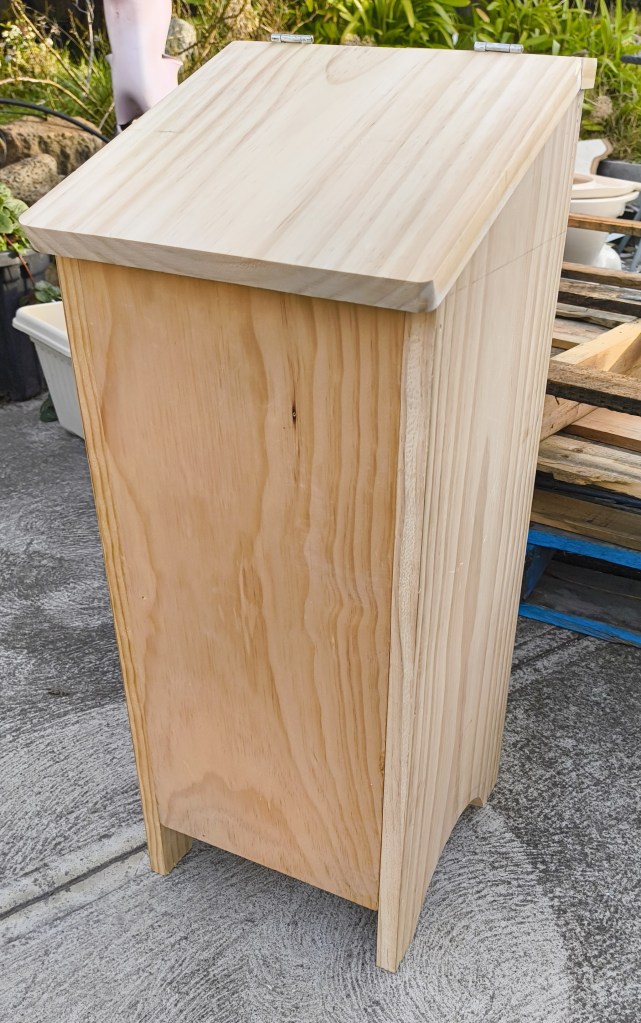
I made the top panel and lid wider than the main section of the bin simply for decoration, and the wider lid also allows you to lift it more easily without needing a handle. If you want, a handle can be added to the lid or the sides of the storage bin. I didn’t think I needed one, so I went without one.
Once the bin is assembled, I recommend tapping the nails below the surface of the timber and then filling the holes with a little bit of putty. This can then be sanded back giving you a much neater and cleaner look that can be painted or stained. From this point onwards what you do to it is entirely up to you and the look you are going for.
Now that I finally have somewhere to store my potatoes properly, I am ready to start dismantling the two old raised beds and start tidying up that corner of the backyard. But before I do, I should probably fill you in on what’s been going on over the past few months.
A brief update
And this brings me to the news I have to share. According to my previous plan from a few months ago, the garden beds I am about to dismantle were going to be replaced with some new ones that were going to be built, prepped and ready for the upcoming spring. I was under the impression I would be at this house for a while, so I would make the most of my garden while I was here.
I had planned to stay in this house for two years when I moved back to Australia. After that, I planned to move out onto the bush block and start the homestead properly. But the realisation of what needed to be done to this house eventually sank in, and very quickly, that two years became five.
And even though my to-do list got as long as my arm, I still kept looking for a way to get out of the city and onto the bush block. After all, I didn’t buy it just for weekend day trips.
And thankfully, I believe I have found it. Part of the reason I haven’t posted as much recently is that I have been working overtime to complete as much of the renovations as possible. Once I get a certain number of jobs done, I can call in contractors to come in and complete the rest of the house, as it involves tasks I can’t do. While I had never originally planned to call in contractors, some of the renovation jobs I discovered that needed doing were far above my skill level. And some of those jobs also required the house to be vacant as it would be unliveable while the work was underway.
Instead of moving into a rental somewhere, I thought now would be the time to make a move out onto the land. I have been talking with a local shed construction company and my council. And I have found a shed that will suit my needs, can easily be converted to a cabin, and, best of all, it won’t break the bank. If everything goes well with my council planning application, the shed should be completed before December so I can celebrate Christmas out on the bush block.
A significant drawback to this is that my plans so far will have to be put on hold. The jam-making, holding a market stall, rebuilding the gardens and turning my backyard into an urban homestead will all have to wait for now, as there is little to no point spending all of the time and resources on setting this backyard up for something big if I won’t be here for it. But this will be worthwhile if it means my goals are achieved sooner rather than later.
For next week’s post, I will bring you up to speed on the work I have been doing around the house and yard during my time away. And I will also cover what I am doing to prepare to move out onto the land. There will also be a look back on the year that was as I celebrate the second anniversary of the Vandemonian homesteader. So it’s sure to be another good post.
And before I go today, I have one more bit of good news to share. About a month ago, while looking at the local dog shelter’s Facebook page, I found a fantastic-looking dog that I decided to adopt. She has quickly settled in and even helps with my jobs around the house. So, I would like to introduce Natasha to you all. Given her curiosity and love of trips out into the bush, it’s safe to say there will be plenty of her in the future.

With that done, I believe it’s time for me to go. Until next time, thanks for dropping in. Have yourself a good one and I will catch you later.

Leave a comment