Hello, and welcome back to the Vandemonian homesteader. With any luck, you’ve had a great few days since my last post. Although I haven’t been able to get outside and do much, I have thoroughly enjoyed the beautiful rain we’ve been given down here. Nothing does wonders more than a couple of days of that light, drizzly rain that just soaks into everything, I love it.
“Wait, what’s this? Two posts in one week?” I hear you say. As I mentioned at the end of my last post, posting on Mondays was becoming too difficult for me to maintain due to my current work and life commitments. I really want to keep posting weekly, as I believe that weekly updates work best for sharing what I get up to. Anything longer than a week and giving updates becomes more of a list than a flowing post. This is why, from now on, I will post every Friday.
With that out of the way, let’s proceed with today’s post.
A crucial part of my plan to turn the backyard into more of an urban homestead involved adding more garden beds. After all, it’s hard to grow stuff if I haven’t got anywhere to grow it. Over the past spring and summer, I dug four beds, added some soil and compost, threw in some seeds, and hoped for the best. Two old timber beds that were here were cleared out and made usable. Money was very tight; I had just moved back to Australia and didn’t have a great deal of disposable income to spend on gardening materials. So, all in all, it wasn’t an ideal start. But to be honest, not all starts are ideal, and the ones that aren’t perfect are more often better as you learn more when stuff doesn’t work the first time.
Deep and meaningful thoughts aside, obviously, I got mixed results. Some plants worked well, like kale, tomatoes, silver beet, and potatoes. Others struggled, like the Brussels sprouts and beans. And then some either died as soon as they could or didn’t even bother trying, like the pumpkin, corn and zucchinis.
At the end of the day, these four beds did the job, and ultimately, I used what I had at the time, which is my motto, after all. So, it wasn’t a complete failure but more of a steep learning curve. Now that I plan to go bigger, I need better garden beds. Digging up the grass was great, but a nice pine sleeper bed looks great and has far more practical applications than a patch of bare soil. And unlike last year, I now have the time and resources to make it happen.
This is one project that I knew would be a challenge with my budget of $50 a week. As I knew it was coming, I spent a good few weeks scouring the local online marketplaces and looking for materials I could use, with no luck.
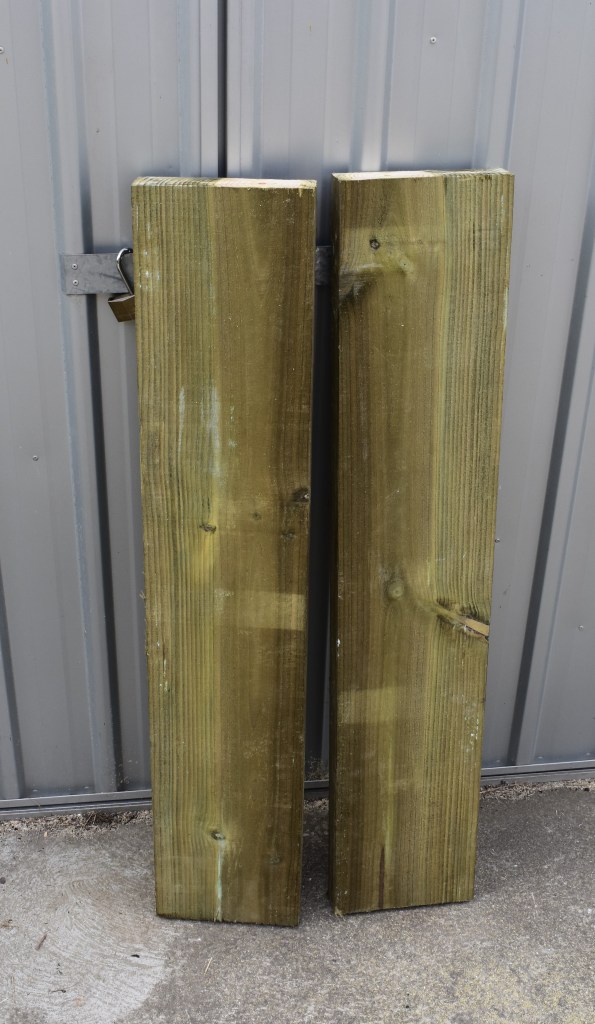
Garden sleepers are not cheap. Yes, you can find some that are more affordable than others, but if you’re making something on a budget that requires them, you may need to save up some money before starting a project like this. The ones I purchased were 200x50x2400mm, and they ended up costing $22. They were one of the cheapest ones I could find that still looked how I wanted. I used three of them to make this one bed, which ended up costing a total of $66. While this isn’t a bad price for one bed, I will need at least another nine of these sleepers to do what I have planned, and then I will need to fill them, which will further increase the cost. I will be buying, making and filling them one at a time in an attempt to make it easier financially. Hopefully, I can use my compost heaps to help fill them instead of going to the landscaping supply store for soil and compost.
You could also use untreated timber. Untreated pine can last a few years; untreated hardwoods could last well over eight to a decade, depending on the weather and pests in your area. I don’t imagine untreated timber would last long in places like Queensland with its termites. Thankfully, we don’t have to worry about that down here in Tasmania.
Depending on the size of your beds and the style you go for, you might be able to save some money, but when I looked into it, there wasn’t much of a price difference, in my opinion. The planks of pine I found comparable to the sleepers I got were under half the width and height of what I eventually decided on. Yes, they were cheaper at face value, but they lacked the big, solid, sturdy look I was going for and will need. In addition, I plan to repurpose the sleepers for other projects when I prepare to move out of this house. So for me, the treated sleepers seemed the best choice in my mind.
What sleepers are best?
Suppose you have decided to go with the treated pine sleepers. You need to be aware that not all sleepers are treated the same. Some can be potentially toxic. When shopping for sleepers, you must watch and avoid anything tagged or labelled that it was treated with C.C.A.
C.C.A, or Chromated Copper Arsenate, is a method of treating timber that helps protect it from mould and insects. It’s a relatively cheap and easy method of treating timber, which would be great if it wasn’t for the fact that wood treated this way ends up toxic. Some countries have outright banned this treatment method. However, it’s still used here in Australia but has been restricted to materials used in timber fences, retaining walls and lattice. Essentially, it is now reserved for the use of anything structural outdoors.
To make it easily identifiable, it has to be labelled and sold as being treated with C.C.A, and each piece of timber should also be tagged, stating its treatment method. As most sleepers used for making garden beds are generally meant for building retaining walls, there is a risk it could be treated with C.C.A as they fall under a different classification from materials that can be used in outdoor furniture, play equipment, garden beds and patios. If the sleepers are used for their intended purpose, that’s fine. It won’t affect anybody. But suppose someone like me comes along and grabs any old sleeper making vegetable gardens. Then, there is a risk that arsenic, copper and chromium could leech into the soil and be absorbed by the plants growing within the beds. As I eat the vegetables, I also ingest the chemicals from the timber treatment process.
There is also the fact that some people can develop rashes or skin irritations when they come into contact with C.C.A.-treated timber, and you can see why it’s worth avoiding. So, instead of C.C.A, here is another acronym you should look for: A.C.Q.
A.C.Q or Alkaline Copper Quarternary is a safer alternative and the preferred treatment for timber used in garden beds and high-contact areas like playgrounds, picnic tables, outdoor patios, decking, and handrails. It’s still protected against insects and mould like the C.C.A treated pine, but it doesn’t contain any arsenic, so it’s considered much safer. The only real downside to A.C.Q-treated timber is that it may cost a little bit more as treatment costs are higher.
If you are still unsure which sleepers you should purchase, I recommend you check out the manufacturer’s website or call them for further information on how they treat their products and what product they recommend you use. Timberlink supplies a fair bit of timber to Bunnings and most timber merchants around Hobart. Their website is pretty easy to use and navigate, and they have a great section about how each one of their products is treated. Their website showed me that their sleepers are treated with Tanalith- E or Copper azole instead of C.C.A. Although some people say that the copper in their current treatment methods (it’s the copper that makes treated pine look green) can be harmful, plenty of studies show that leech levels into the soil are not enough to be considered dangerous.
At this point, it comes down to what you are comfortable with. If you are still worried about chemicals but want the sleepers. I recommend using plastic sheeting like a pool liner between the garden soil and timber. I didn’t worry about putting in a liner myself. After reading about it online, the various treatment methods. I’m confident it will be okay. The very tiny amount that could leech in and be absorbed isn’t a concern for me.
The build
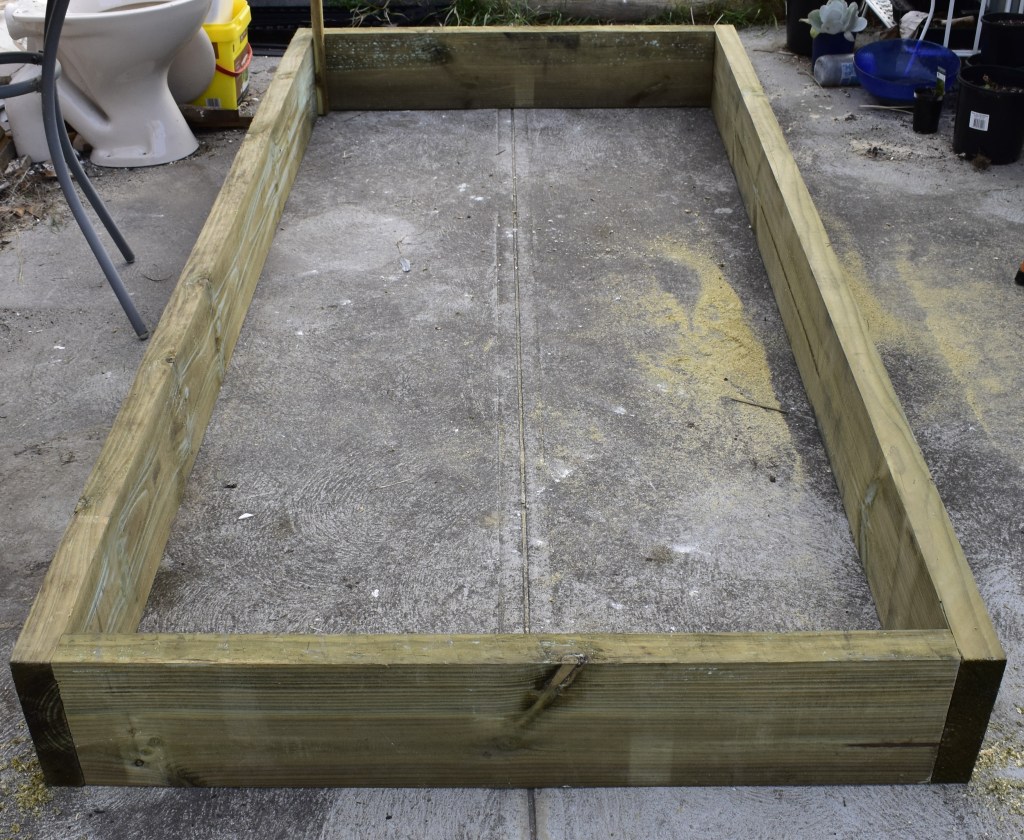
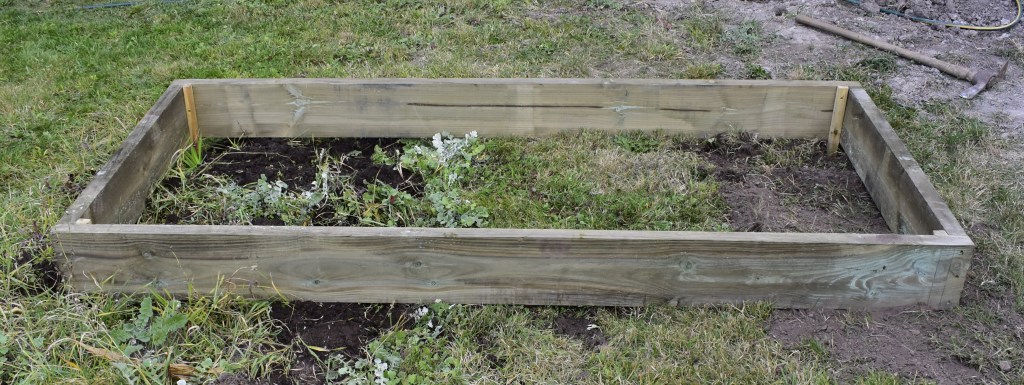
This is an easy project. There is no doubt about that. Today, we are making a basic sleeper garden bed. It’s not really a raised bed, as it’s only 20cm high. If anything, the timber adds a degree of separation from the lawn, which is precisely what I was after.
To make this, I started with
- x3 200x50x2400mm treated pine sleepers
- x4 400mm garden stakes
- x12 100mm galvanised nails. Decking screws can also be used if that’s easier for you. These nails are used to attach the sleepers together; because of this, the nails should be at least double the thickness of the wood you are nailing through. So, if you choose a different-sized piece of timber, you will need nails to match
- x16 65mm screws
- Measuring tape
- Pencil
- Square
- Saw
- Drill and drill bits
- Mask, safety glasses and, if required, hearing protection
I decided to keep two sleepers whole and use them as the sides of my garden beds.
The third was measured and cut into two 1020mm lengths. Remember, when cutting treated pine or any wood, it’s worth wearing a mask; as great as some sawdust can smell, you don’t want to breathe it in, as it can be harmful. I used a circular saw to cut the sleepers, so I also donned eye and hearing protection, and I’d recommend you do the same.
I also marked and measured where the stakes would go. I positioned them in each corner to help secure the bed to the ground. In hindsight, I think I will skip this step on the next one. Once the sleepers are connected, they are pretty heavy, and when filled with compacted soil, they won’t be going anywhere, so looking back on it, I think the stakes are a little pointless.
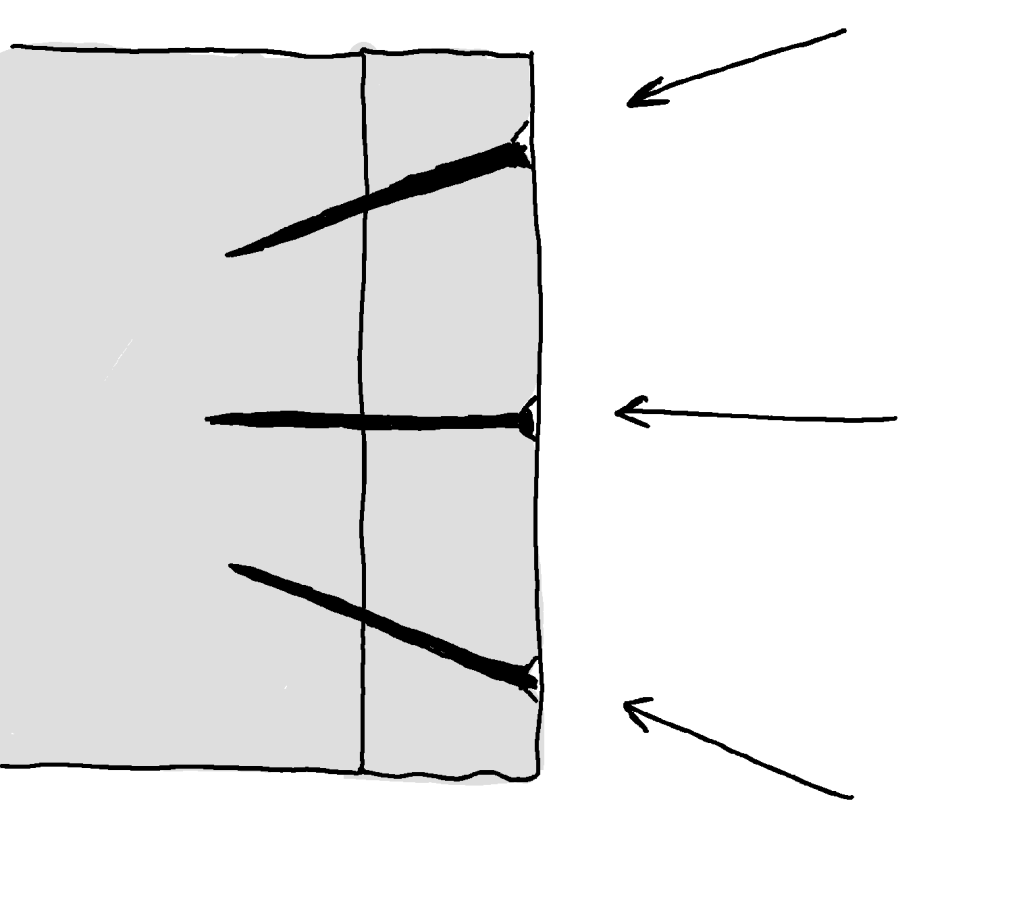
I set the sleepers up together on the ground like they would be as a finished product. I then went around each corner and drilled small pilot holes for the nails. I used three nails per join. If you want more, you will need more nails than the 12 listed above. It pays to ensure each pilot hole is centred with the end sleeper to which you are attaching the side. You don’t want any nails to be too close to the edges of the timber as you risk splitting them or having the end of the nail come out the side of the sleepers. Out of the three nails at each corner, drill the top and bottom pilot holes at an angle so that when they will help secure the join and give the frame a little more strength. Below is an illustration explaining what I mean by the angle of the nails.
Another key note to remember when drilling pilot holes for nails is that you don’t want your drill bit to be the same size or bigger than the nail. Hold the drill bits up to the nail when deciding on the right bit. You want a bit roughly two-thirds the thickness of the nail; this will make it easier to drive the nail in and prevent any issues with the nail bending or the wood splitting.
Once all the pilot holes were made, I then went around and hammered all of the nails in. As mentioned earlier, decking screws would make this stage a lot easier and quicker, and I think that’s what I will go with on the next one.
From there, I put the stakes in the corners of the frame and proceeded to attach them with the 65mm screws.
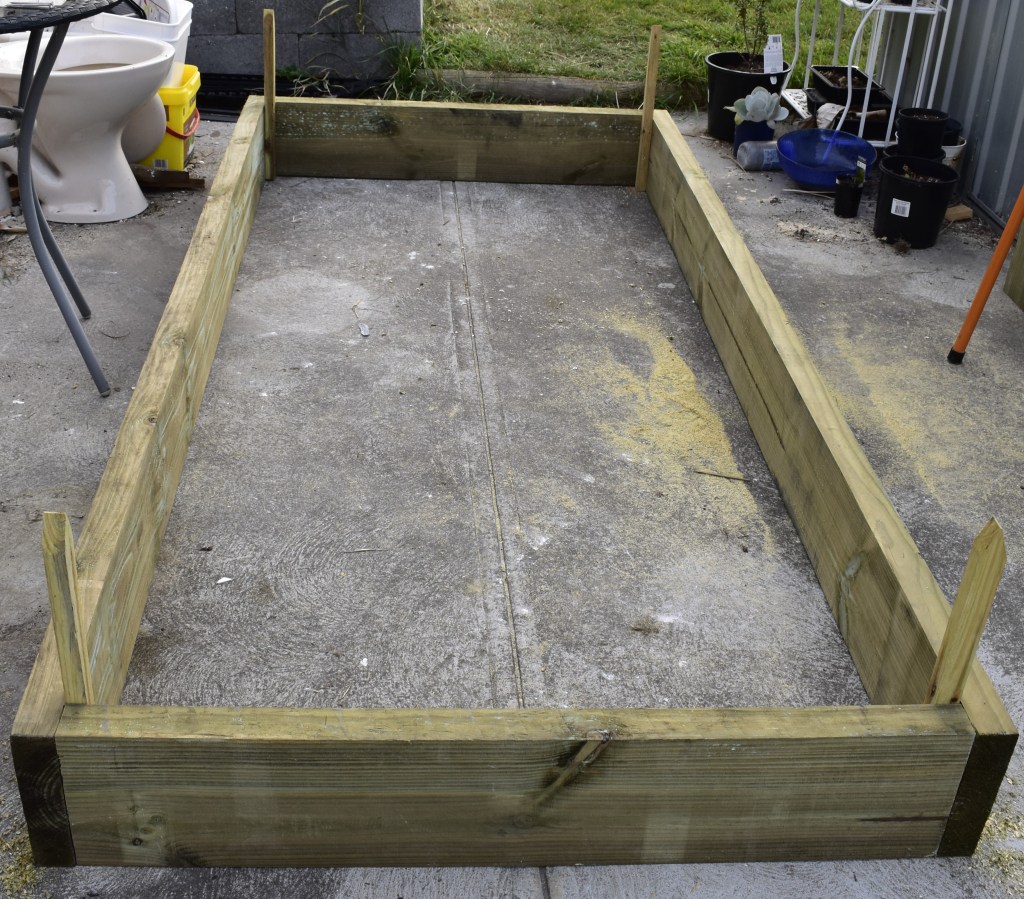
When all the stakes were attached, I carried the bed over to where I wanted it, flipped it over and sat it down with the stakes pointed into the ground. Using a mallet, I then started to drive them in. When hitting bits of wood with a mallet or hammer, you tend to ruin it. So, to save my sleepers from being permanently damaged and marked, I used a scrap bit of timber, sat over where I needed to hit, and then hit the scrap timber instead of the sleepers.
At this point, I was reminded of my terrible soil quality and rock-like clay. So, I had to move the bed aside and, using a mattock, dig holes for the stakes to sit in. When the holes were dug to the correct depth, I moved the bed back into position and backfilled the holes.
Filling the bed
Filling the bed, like making it, was a reasonably straightforward process. I started by laying some plain cardboard over the grass. Then, I got some partially composted waste from my cold compost pile, along with some leaves and sticks from around my yard, and spread them over the cardboard.
I then filled in the rest of the bed using a mixture of bagged compost and garden soil mix. I also added a good few handfuls of dynamic lifter and worm castings from my worm farm. A few shovels of the dirt from my backyard were also thrown in to help bulk it out.
Using a rake in a rather calming and zen-like fashion, I levelled out the soil and gave it a good soak with the hose.
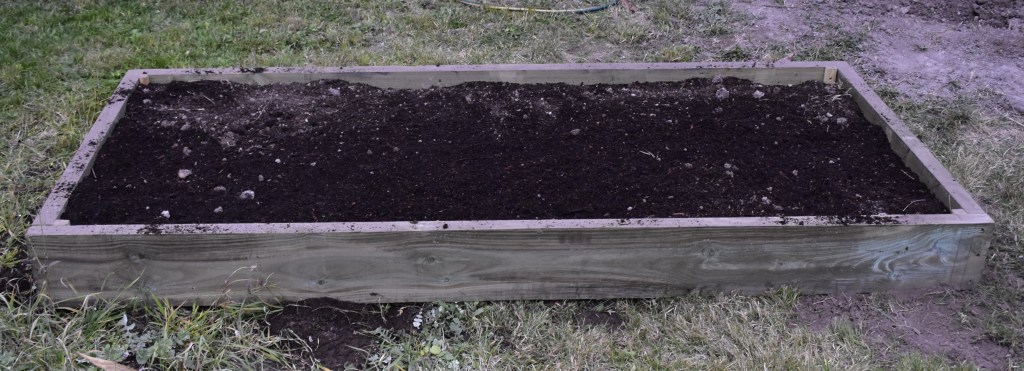
From here, I will let it sit for the week and settle. Next weekend, I will sow some winter seeds and put the new bed to use.
As you can see from the pictures, it looks pretty good; at least, it looks better than what I was doing before. The new timber beds will be a great help for the upcoming spring. With them being placed and spaced out better, I can easily get the lawnmower around and between them, and the timber sides mean I won’t accidentally damage my plants with the brush cutter when tidying up the yard. Another huge positive is that the thick timber edging to the bed allows me to build and attach a netting or a wire cage to help protect my produce should the possum ever make a return.
That brings us to the end of another post. Next week, I will cover what I plan to grow over the winter, and I will look at some useful apps you could use to help keep track of your garden and what is growing in it. So stay tuned to see what I get up to. As always, thanks for dropping in. And if you enjoyed today’s post, feel free to leave a like or subscribe with your email to stay up to date on what I get up to.
Until next time, have a good one, and I will catch you later.

Leave a comment