G’day, and welcome back to the Vandemonian homesteader. I trust that the past week has been treating you well and that all your backyard projects are coming together as planned.
Since my last post, I have been busy preparing for this one. I have spent a lot of spare time gathering and tearing up cardboard and shredding old bits of paper from the office. I will need quite a bit, so I wanted to ensure I had plenty.
I also finished the herb garden and managed to fit everything into the planter box. As good as it looks now, it will look much better once my herbs start growing and add a bit of colour to the doorstep.
Another job I was able to finish during the week was making a new compost heap. The design I chose was pretty quick and easy to set up. It also worked well with my budget and the goals/requirements I had set for the backyard. I will cover how I made it and how you could make the same for your garden later in this post. With that said, let’s jump straight into the wonderful world of composting!
Now, it’s fair to say that composting is a topic that has been done to death. Every man and his dog who does anything remotely garden-related has at one point touched on making compost. Endless videos, books, pamphlets and courses are dotted all over the internet discussing it.
But there is a reason why it is so often discussed. That reason has a lot to do with how easy it is to make and the many benefits that compost can provide. Regardless of how you make it or what you put in it, compost is incredibly beneficial to your garden, especially if all you have to work with is mostly clay and dirt like mine.
By composting, you are harnessing the natural decomposition process but on a larger and quicker scale. In nature, waste, in the form of dead or fallen plant or animal matter, lands on the ground and enriches the soil around it as it breaks down. Composting is the same process but done on a larger scale in a controlled environment, which allows you to collect the finished product.
Making your own compost is also a fantastic way to reduce landfill. According to the Australian Bureau of Statistics, For the 2018-2019 financial year, 15.3 million tonnes of organic waste was generated in Australia. 45% of that (6.9 million tonnes) was sent to landfill.
6.9 million tonnes. That’s one of those numbers you know is a lot, but it’s so much that you struggle to build a mental image of how much it actually is or what that amount is comparable to. Regardless of how you picture it, that is a lot of waste being dumped in landfill. Especially when it could be composted and turned into something useful. If every household or food business in Australia started separating their food scraps and yard waste from their general waste, we could drastically reduce that number. It’s worth saying that many companies and councils are already doing just that. But a lot more could be done to help reduce that number. I find it kind of funny that there are people out there who mow their lawns, trim their plants, throw out all of the offcuts and clippings, and then go to the nearest garden centre and buy several bags of compost. With a little understanding, a bit of work and time, they could make as much compost as they need and not have to spend a cent.
There is a wide variety of composting methods that you can use if you want to start composting at home. Some of them are small odourless units you could keep in your kitchen, like the bokashi systems. These are ideal for smaller spaces like inner city apartments. Worm farms are another great way to turn your waste into something useful. I currently have a worm farm, and since putting it in, I have collected plenty of worm castings and worm tea for my garden and pot plants. I couldn’t recommend them enough. If you want to see how I made mine, feel free to follow this link to my post about making a worm farm and how to keep worms.

Another option is making your own biogas. Although it’s not the same sort of composting we are talking about today, it is still worth mentioning as I love these systems and think they are a great idea. Biogas systems allow you to capture the gas produced by green waste and manures breaking down, and you can then use that gas for heating or cooking. Once the digestion process has been completed, you can collect and use the remaining liquid fertiliser in your garden. There is one kit, in particular, I have my eye on that comes with the biogas bag, a toilet, a gas cooker and all the hoses and connectors you need to set it up. A kit like that easily solves two of the biggest problems I face when I move out onto the bush block: Waste management and how to cook. If you’d like to know more about biogas, I recommend you check out some fantastic videos on YouTube about biogas plants in India. They have a great system in place where food that couldn’t be sold at markets is collected by the local biogas plant and turned into clean energy for the local homes and businesses.
As great as those systems can be, today, I wanted to focus on your more traditional compost heap—the simple pile of stuff found tucked away in the back of most gardens. Composting in this manner generally comes down to two methods: hot or cold.
Hot and cold
Hot compost is where you balance and maintain the greens and browns, creating a perfect living environment for the bacteria that live in and break down your compost. Hot compost is much quicker to make but requires much more work, mainly balancing the nitrogen and carbon levels and regularly aerating the mixture. A healthy hot compost system can reach and hold temperatures around 60 to 70 degrees Celsius. This has the added side effect of killing any seeds that are added to the mix. So, any seeding weeds can be added without the fear of them sprouting up later when you use the compost around your garden. A well-maintained hot compost system can produce ready-to-use compost between 8 weeks to 6 months, depending on the seasons and weather where you are.
Cold compost is the opposite; no heat is generated, and the waste breaks down at a much more natural slower rate. These are easy to maintain as you don’t have to do anything other than add your scraps to the heap. You don’t need to worry about your green and brown ratios, and you don’t have to worry about stirring the pile. As mentioned, cold compost systems take significantly longer; typically, it takes over 12 months or more to produce usable compost, depending on the seasons and weather.
Both methods require the same ingredients, Nitrogen and Carbon, which can be sourced from a list of ingredients split into green and brown categories.
Your greens and browns
Green ingredients are something that is still or was recently living. Greens generally come from a plant-based origin, but not always. Green ingredients provide nitrogen to the compost. Some examples of green ingredients are,
- Lawn clippings
- Vegetable/Fruit offcuts or peels
- Used tea leaves or coffee grounds
- Trimmings from plants
- Eggshells
- Weeds (weeds that are seeding should not be added to cold compost heaps as the seeds will survive the composting process and be transmitted through your garden)
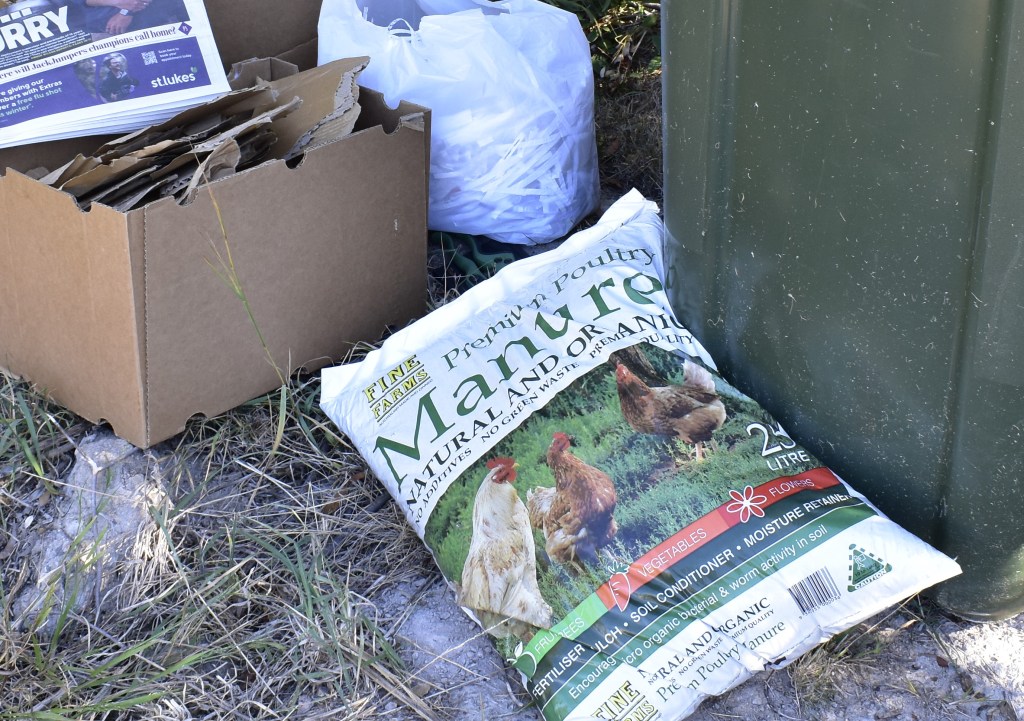
- Chicken, horse or cow manure
Brown ingredients are typically more wooden in origin, but like green ingredients, there are a few exceptions. The brown ingredients provide the carbon that makes up the other half of your compost. Some examples of brown ingredients are,
- Plain brown, unprinted cardboard
- Shredded paper and newspaper
- Sticks and branches
- Sawdust
- Fine woodchips
- Fallen leaves
- Straw or dry grass
- Cotton
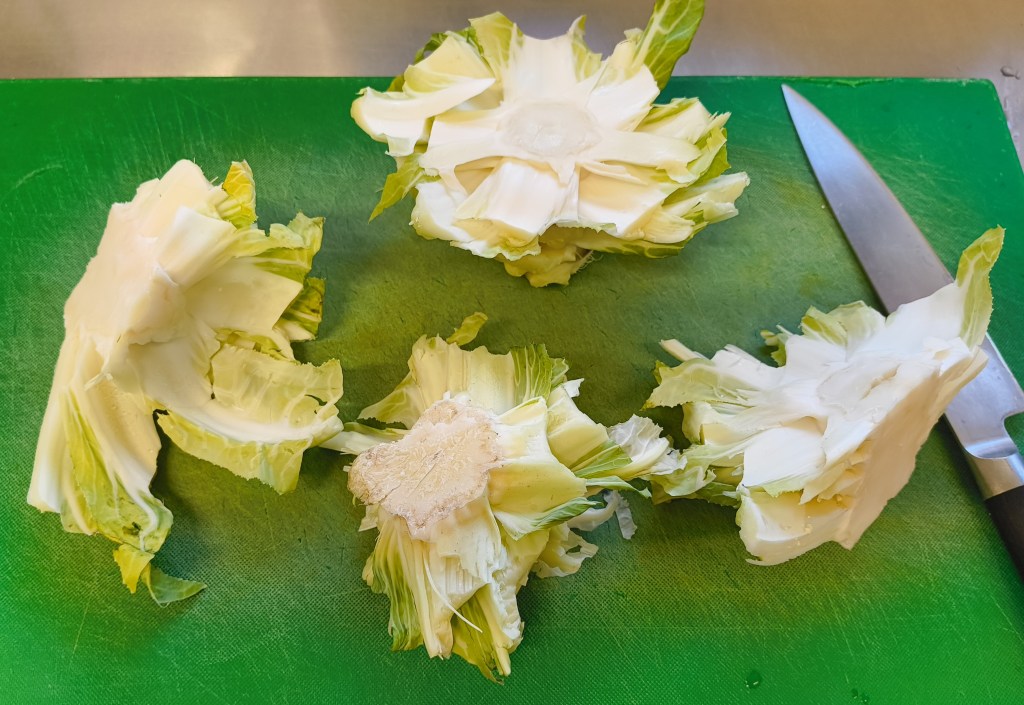
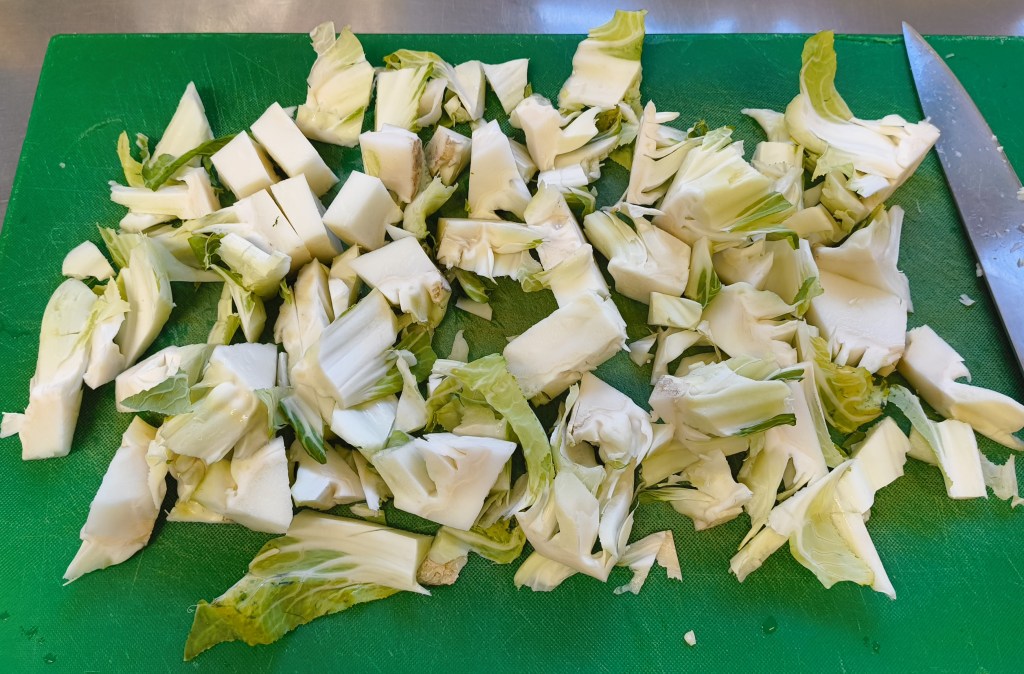
Regardless of the ingredients, if you add something to a compost heap, chop it, cut it, or shred it. Smaller items will be decomposed much quicker. Whenever I have vegetable offcuts that I intend to compost, I will chop them up so they are smaller. As you can see in the pictures below, the cauliflower stalks on the left will break down much quicker than they would in their original size.
Choosing the correct bin for you
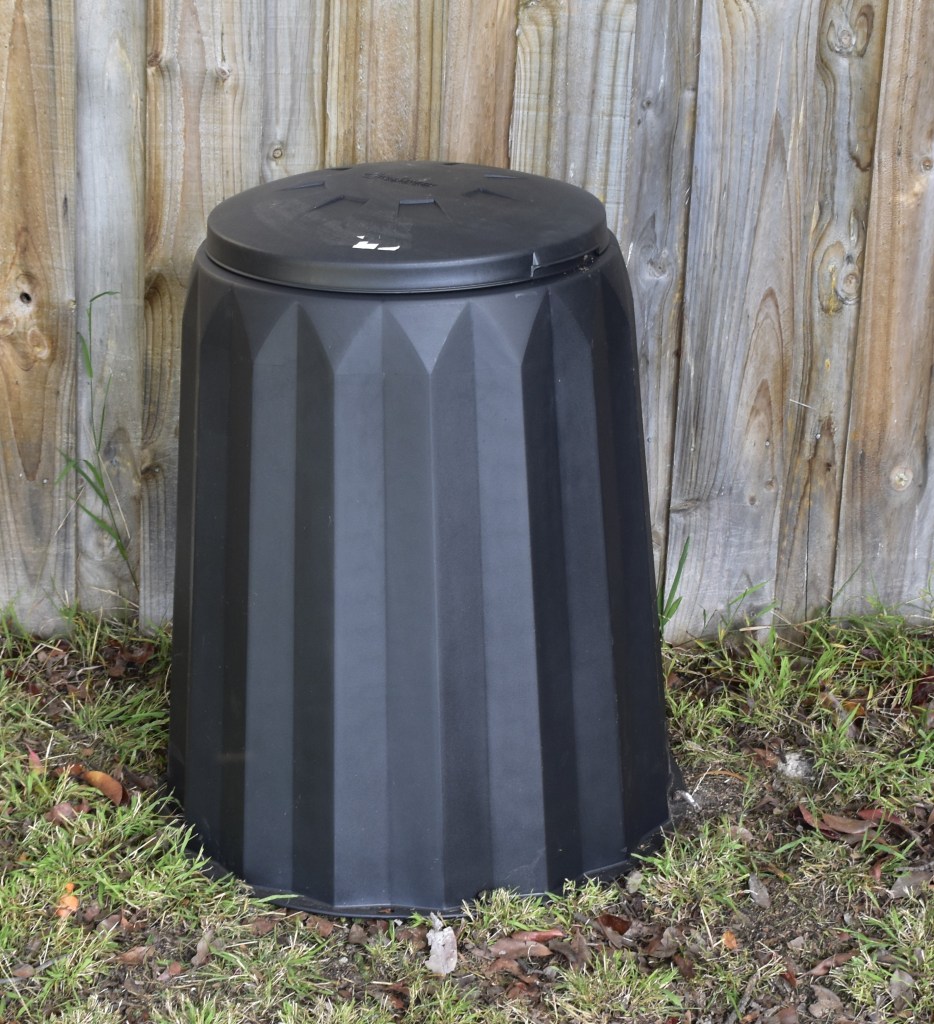
Now that you know what to put in your compost, you’re ready to start. From here, you must decide what to compost them in. A key point to consider here is the amount of waste you can supply it with and how much compost you want/need. There are a lot of compost bins in kits you can get; some are as simple as a bottomless plastic bin that can be sat anywhere, and when you’re ready to collect the finished compost, you simply lift the bin off the pile, and you’re ready to start again. I purchased one of these for my backyard; it’s 150 litres in capacity and costs $55. Overall, it’s not a bad deal.
As you can see from the picture below, it’s as simple and basic as it gets. There is a lid on top and nothing on the base. I positioned mine in the top back corner of my yard up against the fence, somewhere that is easily accessible and out of the way.
Another, more complex kit you could buy is a compost tumbler. These are barrels placed on an axle that you spin. As the barrel rotates, it stirs up and aerates the composting materials. Personally, I like the idea of them, but the price you pay for the size you get is a bit of a turn-off for me. However, suppose you have a small garden and want an easier way to stir your compost instead of using a pitchfork or compost stirrer. In that case, these may be ideal for you.
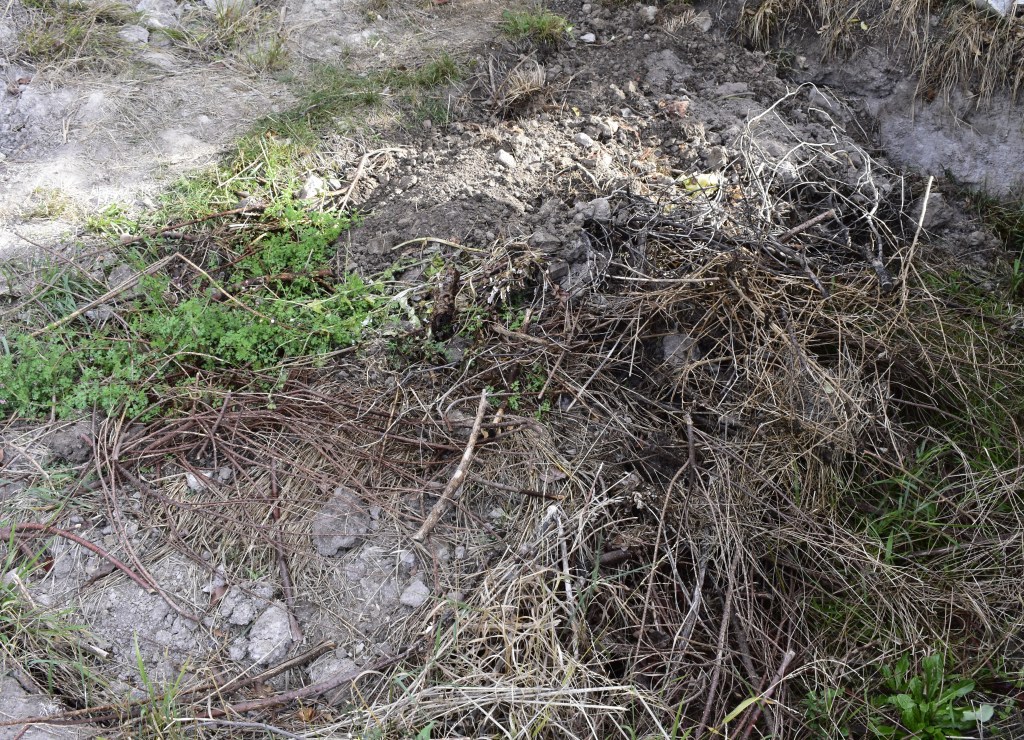
If you’d rather not spend money, you could start a compost heap right on the ground. You can still make fantastic compost by piling all your greens and browns up and leaving them heaped on the ground. There was a large hole dug in the ground in my backyard, so I turned the hole into a cold compost heap, and if all my other compost bins are full, I dump all my garden waste and food scraps into it and every now and then I will hose it down and shovel some dirt onto it. Its not much to look at but it’s perfect for when I need partially composted matter to fill garden beds with.
Finally, if you are budget-conscious and want to keep your compost piles neat and squared away, you could consider making a small corral out of shipping pallets or a compost bin out of some old wood and chicken wire. As I talked about in my last post, shipping pallets are free and easy to come by; with a few nails or screws, you could easily make an excellent corral to store all of your waste.
Today, I will show you how I made an easy-to-make compost bin out of some old timber and a bit of old chicken wire.
Making a chicken wire compost heap
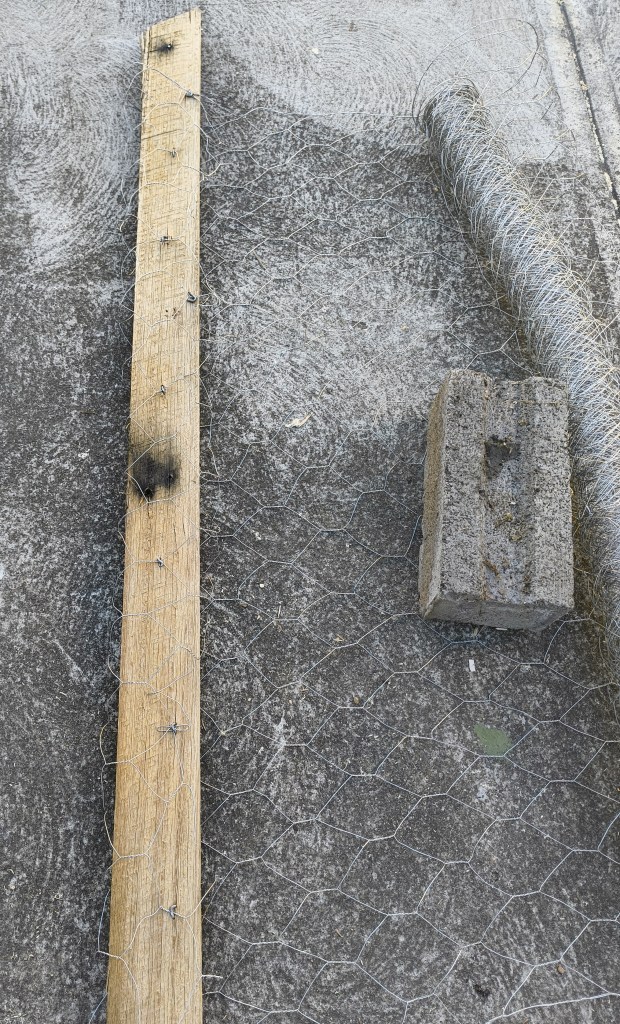
To make a chicken wire compost, you will need,
- Chicken wire 90cm in height
- A piece of timber or a large garden stake 120cm in length
- Galvanised staple nails or a staple gun
- Button head screws
- Washers to fit the screws
- A drill
- Hammer
- Wire cutters
- Safety gloves
All the materials I used for this project were leftovers from other jobs and projects I had done. This didn’t cost me anything other than my time, but if you were to go out and buy what was needed, it wouldn’t break the bank. Some of these materials may also be found in online marketplaces, selling much cheaper than new or even free. After a quick look at the Bunnings website, I realised that buying the materials needed would cost a little over $50. While that’s not a lot, If you spend that much just to buy the materials for this, I would actually recommend you look more into the plastic kits. They are pretty sturdy and would last a lot longer than this will. They are also similarly priced and will save you some time and effort. But as the needed materials are what most gardens already have lying around, if you can find the materials in the back of your garage or shed then bully for you! You’re good to get started.
It is worth mentioning at this point that the length of the timber is relative to the height of the chicken wire. As long as the timber is roughly 20-30cm longer than the height of the wire, you’re good. The extra length is used as a handle and partially buried to support the wire.
- To begin with, lay down the timber, measure and mark 10cm from one end.
- Line the chicken wire up with the 10cm mark and wrap one end of the chicken wire around the timber.
- Once you have wrapped one end of the wire completely around the timber, start nailing the wire down with the staple nails. If you have one, a staple gun will make this process so much easier and quicker. I recommend using as many nails as you can to help attach the wire securely. Remember that you will fill it with food scraps and garden waste. It doesn’t need to be pretty.
- Once that’s done, roll out the other end of the chicken wire. You may need to use some bricks or another length of timber to stop the wire from rolling back up on itself.
- Now comes the hard part: you will have to remember the maths you learned back in school that you thought you would never need. Mainly, we need to remember the part about calculating the diameter of a circle from its circumference. If that sounds intimidating, don’t fret. Thankfully, the internet has many calculators that can do the hard work for you. The finished composter will be circular, and we must ensure the diameter is greater than one metre. If it is less than that, it will be difficult for the composter to generate the heat necessary for a hot compost, and you will end up with a cold composter. I went with 1 metre for mine, but you can go as large as you wish.
- To achieve a diameter of 1 metre, I measured out 320cm of wire and carefully cut off the remainder. It would probably pay to wear safety gloves as you do this, as the freshly cut pieces of wire can be sharp, and as the roll tries to wrap back up on itself once cut, it can easily cut you.
- Now that the wire has been cut to the desired length. Pick up the wire and timber so they are standing and arrange the wire to create a circle, keeping the end bit of wire on the outside. Position the free end of the wire over the timber’s outside. When you are happy with the positioning, lay it back down with the end of the wire facing up.
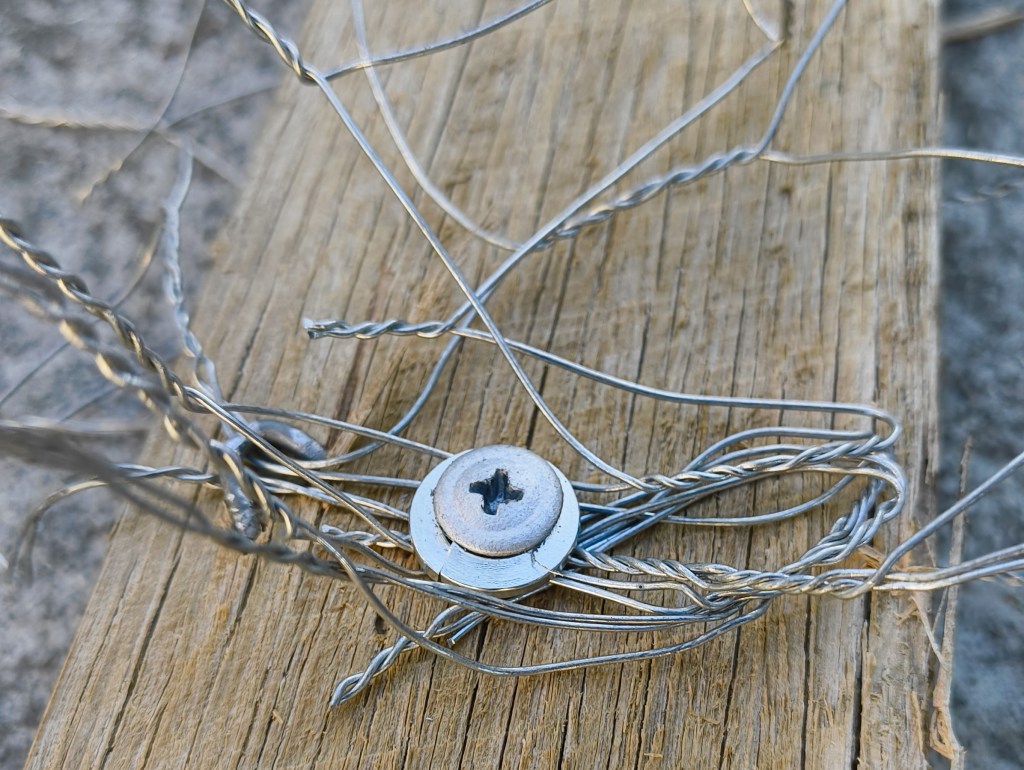
- Bunch up sections of the wire and get one of the button screws and a washer, screw it into the timber and try to get as much of the wire as possible under the washer. Like the staples before, use as many screws as you can until it is stable and secure. The reason when we are using screws and washers instead of more staples is so that when you’re ready to collect the finished compost, you just have to unscrew these. Then, you can “unwrap” the compost mound, giving yourself free and easy access to all of your compost.
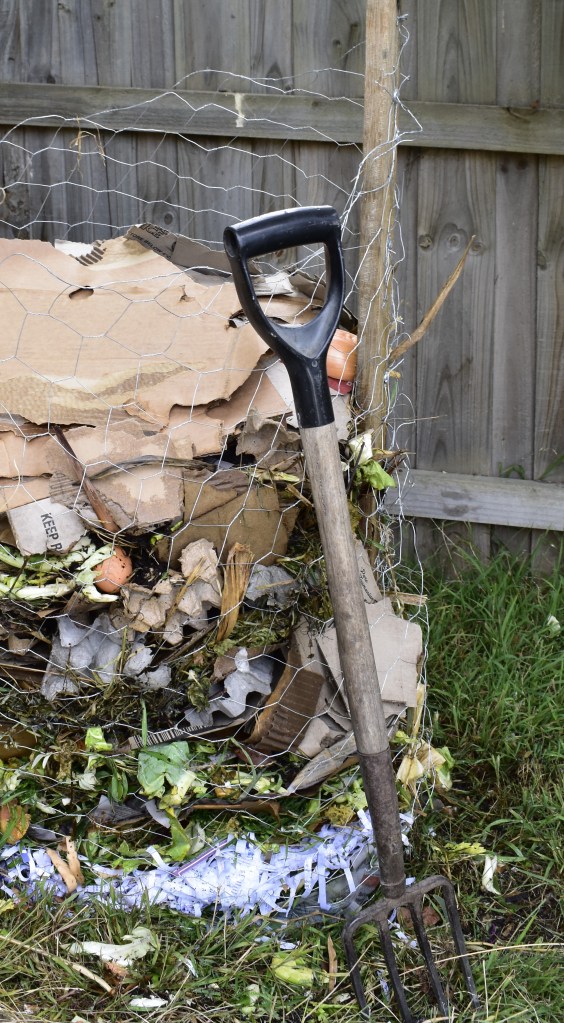
- Once you’ve finished that, figure out where you would like to place the compost heap in your yard if you need to dig a little hole for one end of the timber to sit in. If your backyard is sloped, it may pay to have the compost heap up at the highest point. Carrying food scraps and lawn clippings uphill is much easier than pushing a wheelbarrow full of compost uphill. The dirt in my backyard is too hard and compact to hammer a stake in, so I have to dig little holes and backfill them. When you are ready, stand your wire and timber up, drive in or bury one end of the timber, and you should have something like this.
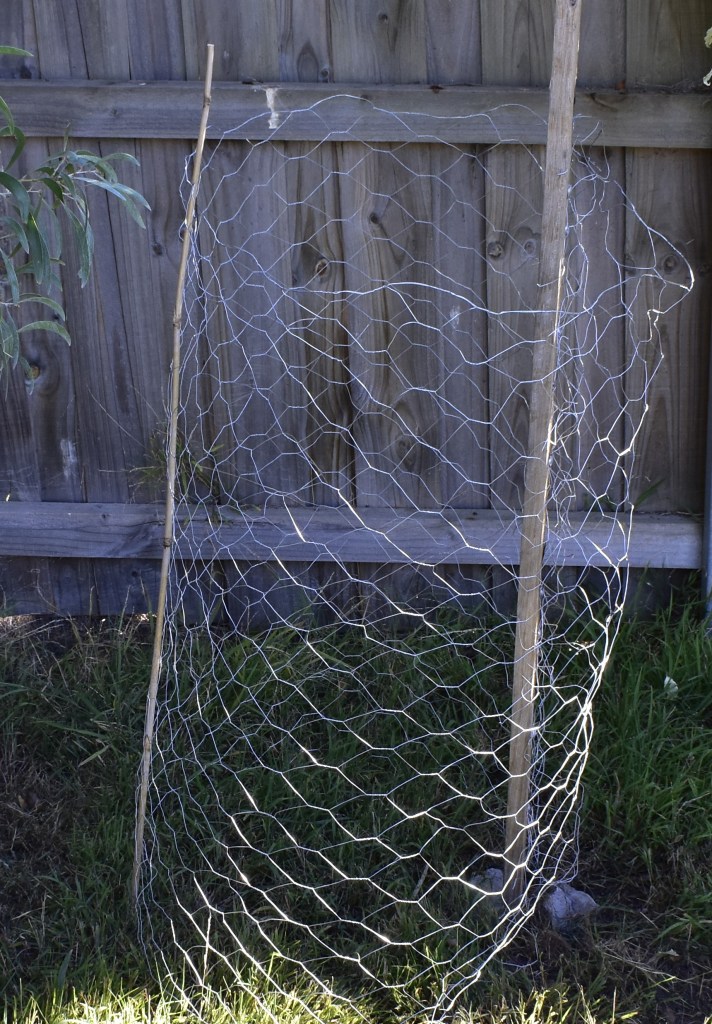
- If you find your wire is struggling to keep its shape, you can use a star picket or help support the other side of it. But once it is full, it will gain more stability.
And there you go. Now you’re ready to fill it up and start composting! Now that you have a compost bin ready let’s fill it up.
Filling your bin
As we discussed earlier, you could try two methods of composting. At this point, what you put in the bin will decide your chosen method.
A cold compost system may be ideal if you don’t want to keep managing and maintaining your compost. Instead, leave it all to Mother Nature and let her take the wheel. Even though hot compost gives greater yields over a shorter timeframe, I recommend having at least one cold compost heap in your garden. I’m a big fan of burying half-composted scraps, leaves, and twigs in new garden beds, and cold compost is a great way to store these materials until needed. There are no special steps required to make cold compost. All you need to do is dump your scraps and waste into a pile and let nature run its course, continually adding more scraps as they become available. However, you still need to stick to the green and brown ingredients, but that’s the only rule.
If you would prefer a hot compost system, you will need to maintain it and ensure you have the right amount of greens and browns. You will also need to aerate it and ensure it is moist. Too wet or dry, and it won’t work. You are looking for the moisture levels of a damp sponge.
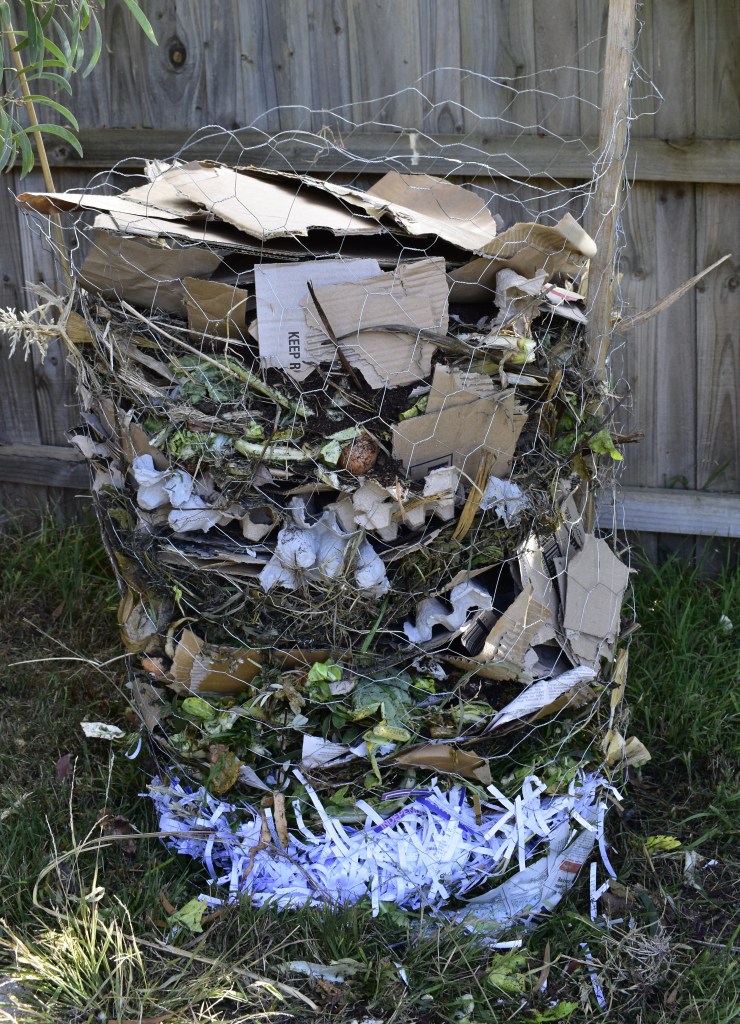
When building a hot compost, you must aim for a browns greens ratio of two to one. Two parts brown to one part green. Layer them like a big lasagne when you put them into the compost bin. You may also need to water the pile every few layers, especially if everything is dry. Every few layers, if you have some, try adding chicken manure. Although it’s not necessary, chicken manure helps by adding extra bacteria, giving your compost a running start.
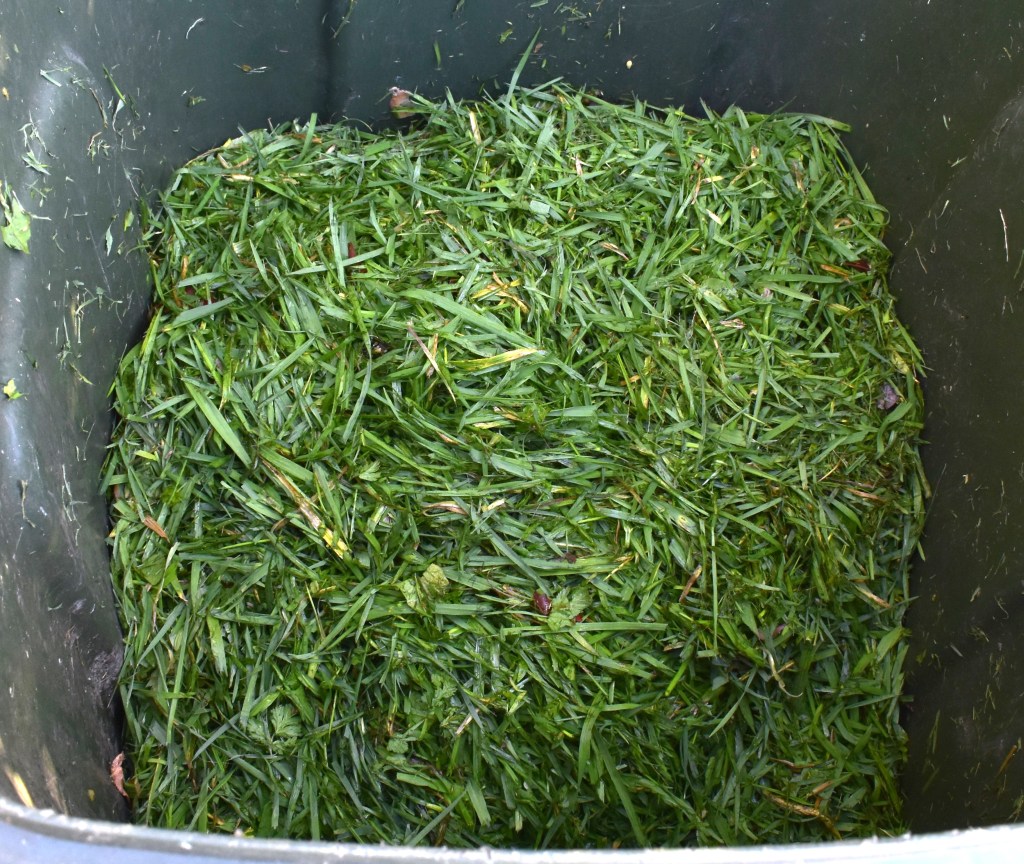
Once you’ve filled up your bin, it should look a little something like this.
Now give It a quick stir and, if needed, another quick water and allow it to sit for another two days before giving it another stir. You will need to stir it at least once a week up to every two to three days to add more air to the mixture. To stir it, you could use a shovel, pitchfork, or a great little device called a compost stirrer to stir or turn your compost. I grabbed one from Bunnings for $25, and so far, it seems to do a great job and I find it easier than using the pitchfork.

While we are on the subject of equipment you may need, if you haven’t got one already, you should get yourself a probe thermometer to help check the internal temperature of the compost bin. As I mentioned earlier, a healthy hot compost system can reach temperatures around 60 to 70 degrees Celsius. Digital or mechanical probe thermometers are ideal to help monitor the temperature of the heap. By regularly checking its temperature, you can quickly identify any problems that may arise.
For example, suppose your heap is starting to develop foul odours or is getting too hot (temperatures over 70 degrees Celsius). In that case, you must create a vent in the pile to help some heat escape. Once the temperature drops to normal, you will should add more browns (carbon), as this was caused by your pile having too many greens (nitrogen).
And if your compost pile isn’t heating up the way it should, you may have too much brown materials. Adding more greens and manure can introduce more bacteria to your compost, which will help increase the temperature and improve the overall health of your heap.
Now you wait. Provided you maintain your compost heap, it won’t be long before you can collect all that beautiful compost. With any luck, this heap will be ready for all my spring and summer garden needs; if it’s not that’s okay, I have several other compost systems dotted around my backyard that I can make use of.
To wrap things up today, the key points you should remember are that, like many things, composting can be as easy as you want to make it. Also, remember what you can and can’t put in it. If it is something you would like to try, I recommend you look into what system would work best for you, as there are many different systems you could use and not all of them need to involve digging out in the garden, as I mentioned before there are some great little systems that sit on the kitchen counter that would be perfect for apartments or people with only a few potted plants.
In my future posts, I will keep you updated on the progress of my composting, and I will keep you informed should any problems arise, which they no doubt will.
Speaking of future posts, I will now post on Fridays instead of Mondays. As you probably noticed, my current schedules and life commitments make posting on a Monday difficult. To remedy this, I will now be posting every Friday. Starting this Friday, I will build the first of my new pine sleeper garden beds. I will also explain what you should look for and be mindful of when using treated pine sleepers in the garden to avoid accidentally building a toxic garden.
I hope you’ve enjoyed today’s post and learned something from it. I had a lot of fun making and researching it and learned a lot in the process. Until my next post, have yourself a good one. Thanks for dropping in, and I will catch you later.
