
Hello, and welcome back to the Vandemonian homesteader. I hope that the past week has been treating you well. Since my last post, I have been refining and researching my plans for the rest of the year using my thoughts and insights from last week’s reflections.
But with all that going on in the background, I have also been enjoying the success of a quiet little unsung hero in my garden who has been doing some fantastic things. And that is what I would like to talk about today. Today, I wanted to shine a light on the humble strawberry. Initially, I intended this to be a two-part post, but as I type this, I realise that making it a three-part will be much more manageable and less of a burden to read.
So today will be Strawberries 101, a brief rundown on strawberries and what they like and dislike. Next week will be how to propagate them from runners and seeds. The third and final week will be a guide on how to build a strawberry tower so that you can maximise your growing space, increase your yield, and not have to bend over all the time.
A few months ago, I received a handful of strawberry runners taken from a friend’s plant. Trying my luck, I decided to put them into a small container of potting mix and see if they took root. Unfortunately, all but one of them died. That one survivor, though, has well and truly made up for the loss of the others. It quickly grew into a decent-sized plant, and after I had transferred it to a larger pot outside, it quickly started to send out runners of its own.
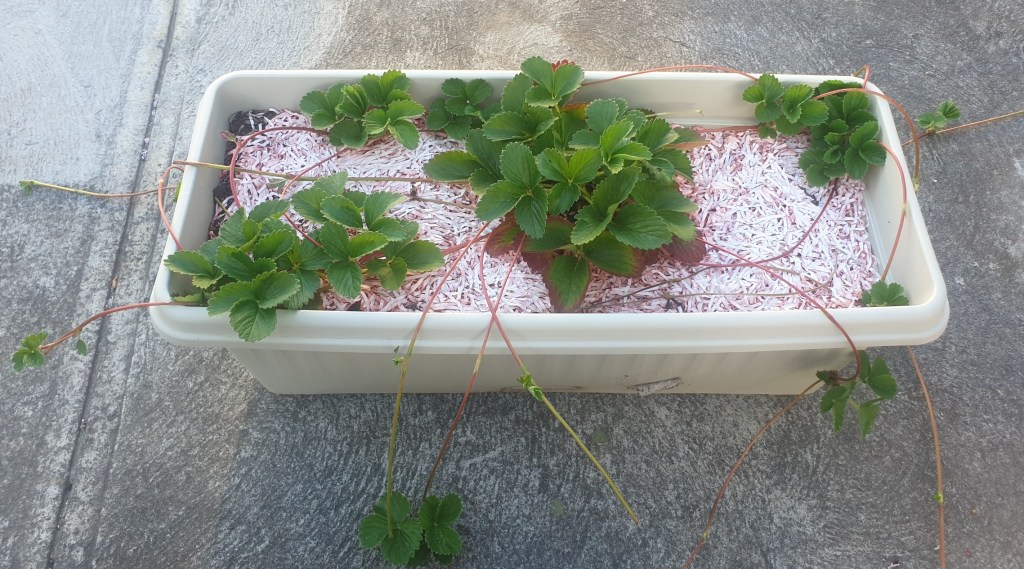
Given that It was now in a large pot, I placed the runners back into the same pot and allowed the smaller daughter plants to take root there. But very quickly, as soon as they were established, those new daughter plants sent out runners of their own. It wasn’t long before I had a mass of strawberry runners creeping across the concrete slab in my backyard, looking for somewhere to take root.
Not wanting to trim it just to keep the plant tidy and the strawberries contained, I thought I would give it somewhere where it could grow as much as it wanted and hopefully produce as many strawberries as possible when the season came.
Strawberry 101
Before I start what I am now calling the strawberry trilogy, we should probably dive a little into what strawberries are and how they work. With two other posts coming, I thought it would be best to know more about strawberries than just your nan having them in her garden and that they taste good. So, to get started, let’s look at the three types of strawberries, which can be June-bearing, everbearing, or day-neutral. The strawberry plant type dictates how much and when it will fruit.
- June-bearing strawberries usually have all their fruit ready to harvest over three weeks in late spring and early summer.
- Everbearing strawberries. Despite their name, they do not produce berries all year round. Instead, they have two harvests; if conditions are ideal, they can potentially have a third. They don’t send out as many runners as the June-bearing variety because most of their energy is diverted into producing those extra berries.
- Day-neutral strawberries are different from the others because they can have more harvests than the others as they continually flower and grow fruit over spring, summer, and well into autumn. However, the temperature can slow their growth. During the hotter periods of summer, they will slow fruit growth and resume it again when the temperature drops in autumn. Ideally, they like temperatures between 7 – 30 degrees Celsius.
From there, like most plants, there are countless different varieties, some with bigger berries and some with smaller but more flavourful or fragrant berries. Here in Australia, and I suspect most places, day-neutral strawberries are favoured among farmers as they allow for a greater harvest. Albion, San Andres and Melba are popular varieties grown here and are all Day-neutral.
Parts of a strawberry plant
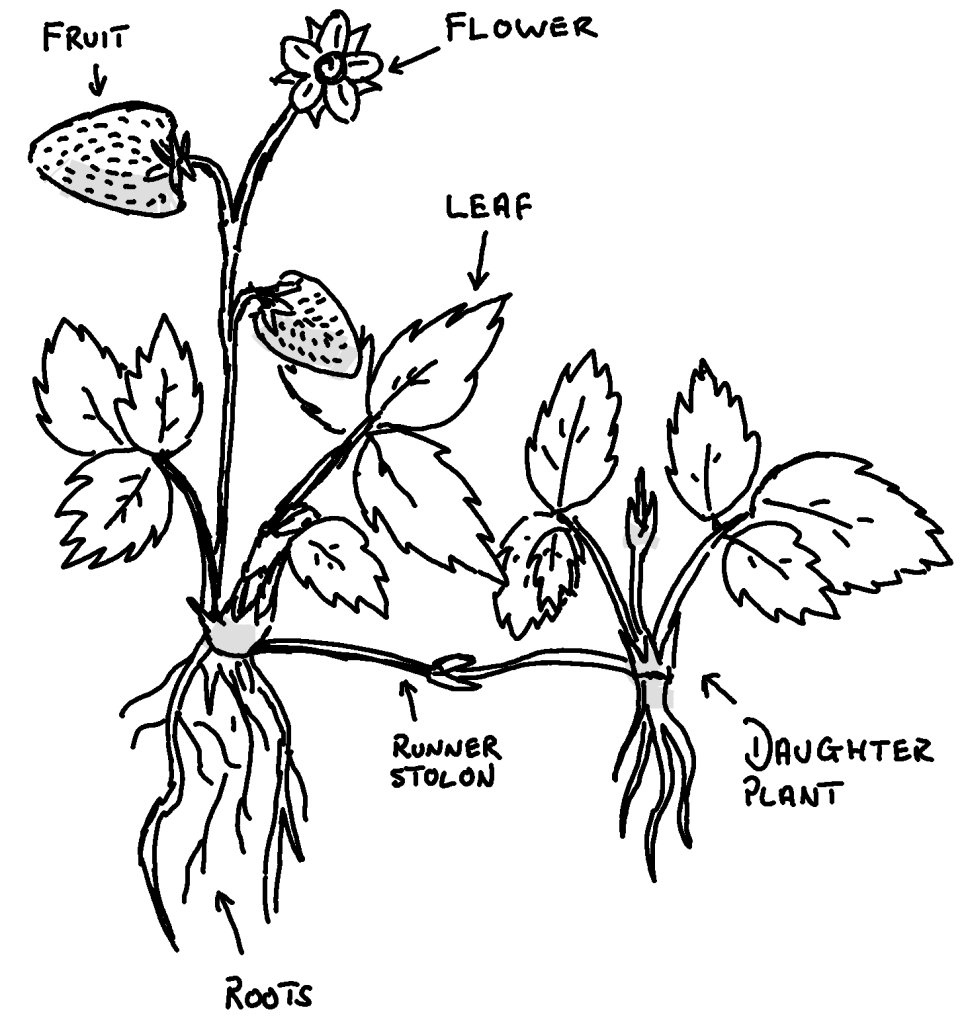
Here is a rough diagram of the various parts of a strawberry plant. I know I am not going to win any art prizes now, but hopefully, it does the job. In the picture above, you can see the main strawberry plant on the left with its berry and flower truss coming up the centre. To the right, I have drawn a daughter plant, resulting from a strawberry runner hitting the soil, taking root and creating a new plant. In the picture below, you can see the small yellow or brownish lumps on the bottom of the runner that will turn into roots when they hit soil.

Also, at this point, I thought it worth mentioning that a strawberry isn’t actually a berry. It’s referred to as a false fruit. Like raspberries, a strawberry is made up of multiple small fruits all clumped together to form the “berry” we know. For the sake of convenience, though, as I type this, I will refer to it as a berry.
Where and how to keep strawberries
Strawberry plants are definitely hardy little things. For the most part, they are pretty foolproof, which is why they are so popular and grown everywhere. But they do have their likes and dislikes, and you can easily unknowingly hamper them. Especially with everbearing strawberries that, as mentioned earlier, can produce a third harvest if growing conditions are ideal.
When looking to grow strawberries, as with anything else, you first need to prepare the garden bed or pots you plan to grow them in. Strawberries love sandy soil with good drainage that is rich in organic matter. Combining compost, sand and potting mix can create a great mixture if you are working with pots. They also require the soil to be slightly acidic, so you must test and tweak your soil’s pH level. A pH of 5.8 to 6.2 is considered ideal for strawberries but they will also grow happily between a pH level of 5 to 7.
Strawberries love to be in direct sunlight, and they also love their water, so in the cool of the morning or evening, make sure to give them a good drink. You can also mix in some slow-release fertiliser or aged cow manure when potting or planting. But do not over-fertilise, as it can result in the plant focusing on growth instead of fruit production.
Hopefully, with what we touched on today, you now have a better understanding of strawberries. I know some of the topics could be more in-depth, but I don’t want to get bogged down with all the technical details just yet, as I will be peppering them through the next two posts and bringing them up when they are relevant and needed instead of dumping them here.
Thank you for stopping by, and please join me next week as I will have finished taking down my dining room and replacing it with a new propagation station that I will use to demonstrate how to take and grow strawberries from cuttings and seeds. Until then, have yourself a good one and I will catch you later.
