Hello there, and welcome back to the Vandemonian homesteader. I hope that 2024 is treating you well so far. Today’s post Is my first actual post for the year, and I look forward to getting everything underway. As I mentioned last week, I have a lot planned for this year, and I can’t wait to get it started. To get the ball rolling, I thought I would add something I felt my garden was missing: a compost system. And while I have a compost heap of sorts in the backyard, its purpose is more for landfill than anything else. I wanted something a little more efficient that I could use around the garden. So, I decided on a worm farm.
Worms are amazingly beneficial to your garden. I have talked in the past about the poor soil quality I have here, how it is mostly clay and how most plants in the soil here struggle at first. While the gardens I have put in are slowly improving it, I have noticed a distinct lack of worms or life other than grass and weeds In the soil.
The benefits of having worms them in your soil are almost endless. They decompact and aerate the soil, they break down plant matter, and their poo or castings get distributed throughout the garden depositing nutrients wherever they go. Like most creatures, worms will go wherever the living conditions suit them best. And as I improve the soil quality, the worms will gradually find their way to my yard and help improve things.
However, I don’t want to wait that long, so I will make a worm farm instead. Not only will I be able to collect worms and spread them around the garden, but I can also collect their worm castings (poo) and worm juice. And as far as fertilizer goes, worm castings and worm juice are worth their weight in gold.
But before we get started, what are worm castings and worm juice?
Worm castings are a nice way to say worm poo. Everybody knows how good animal manure or poo is for their garden, cow, sheep, horse, pony or chicken. It doesn’t matter where it comes from; simply mixing it into the soil before you plant or spreading it around the garden and allowing it to break down can be a fantastic way to add extra nutrients to the soil. Worm castings work similarly, except they don’t need to break down as much as the manure from a larger animal does. This means it can be absorbed by your plants much quicker. There is also the bonus that worm castings and juice won’t burn plants like other fertilizers will.
Worm juice is essentially the liquid that collects at the bottom of your worm farm; it is a mixture of moisture and worm waste that has filtered through the layers of the worm farm to the pool at the bottom. Because of this, worm juice is a fantastic liquid fertilizer that you can dilute or use straight. It’s perfect to use with pot plants.
So, to take advantage of all these benefits, I decided to get myself a worm farm. A quick look at my local hardware store revealed that a standard worm farm would cost me around $80, and that didn’t include the worms, which were an additional $30, or soil to fill the farm, an extra $10. I was looking at roughly $110-$120 to buy a worm farm kit and what was needed to start it.
After a quick look online before heading to the store, I found a few examples of a system that could easily be made at home. Not only was it easy to buy the bits and pieces I needed, but in less than an hour of work, it was set up and ready to go.
The plan
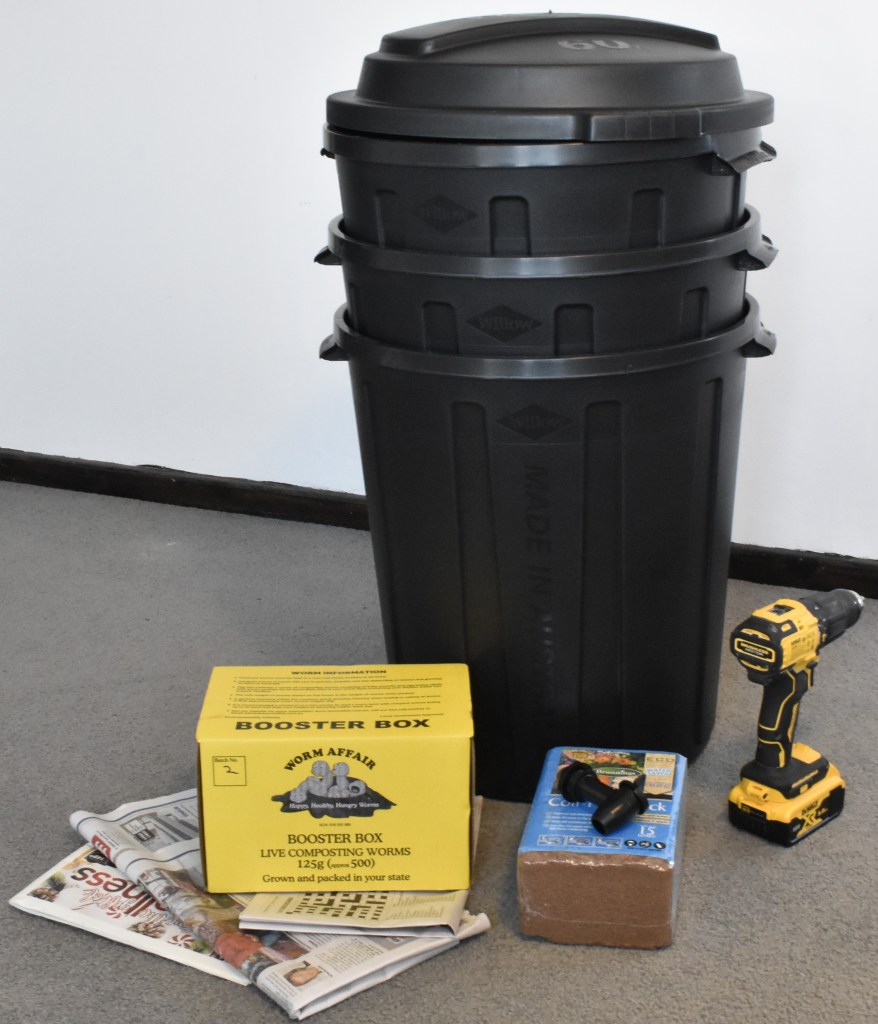
To begin with, I purchased,
- Three 60-litre garbage bins
- A matching lid
- Half a coir brick
- A box of 500 or more worms
- A small tap with a flange
You will also need,
- Some newspaper
- Compost mix
- Potting mix
- A drill with assorted drill bits
All in all, I spent $96.94, just under a hundred dollars. I would have paid $109.40 if I had purchased the kit and worms. Although I didn’t save a great deal, just a little over $12, I ended up with a worm farm several times larger. The kit from my local store would be ideal for a small family wanting to cut back on waste and have an easy source of compost. But I needed something larger, and purchasing a kit similar in size to what I made would have cost well over $150.
But before running out and buying what you need to make or start a worm farm, look at the size and price that works for you. Work out what size would be practical for your garden, and then go from there. If you find yourself needing/wanting something big, then feel free to do as I do. If you need something bigger, go for it. Many people often use old bathtubs as worm farms, so if you have the space, that is an option.
It is also worth mentioning that If you are okay with something smaller, you could look for 20 or 10-litre food-grade buckets instead of buying a worm farm kit or bin from the store. Most cafes and restaurants would have a stack of these, so you could try asking there. Or you might even find some online through your local Facebook marketplace. They can be a lot cheaper or possibly even free.
What to do
To begin with, cut or break the coir brick in half and leave it to soak in a clean bucket.
Get your drill and a good-sized drill bit. I went with the 10mm drill bit as it’s the biggest I have without using my spade bits. Carefully drill a series of holes into the base of two bins. The size of the holes isn’t essential. It just needs to be big enough for the worms to move through. Try not to go too large; you risk weakening the bin if you fill it with a lot of big holes.
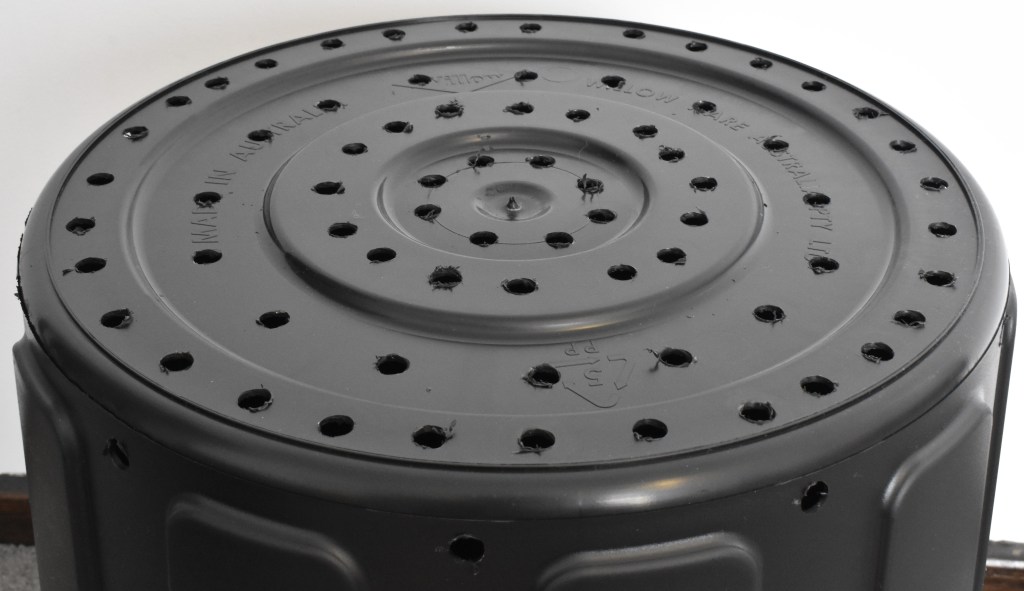
Then, choose a small drill bit and drill a few holes into the lid to allow for ventilation. Try not to drill holes where water could collect or pool. You don’t want excess water entering your worm farm.

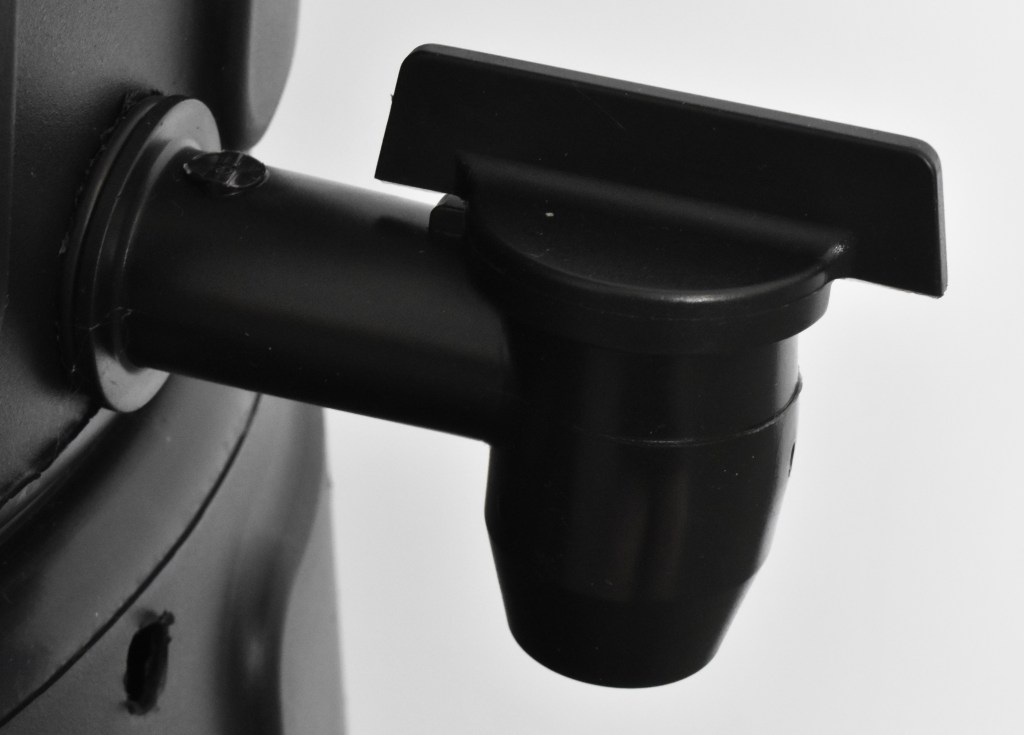
When you’ve finished drilling holes into two bins, lay the third on its side and just above the base, drill a hole large enough for the tap. Then screw on the tap and flange. At this point, it pays to check the tap for leaks. So fill the bin with enough water to cover the tap and let it sit for a while. If you have no leaks, congratulations. If you do, some kitchen-safe silicone can be used to seal the tap.
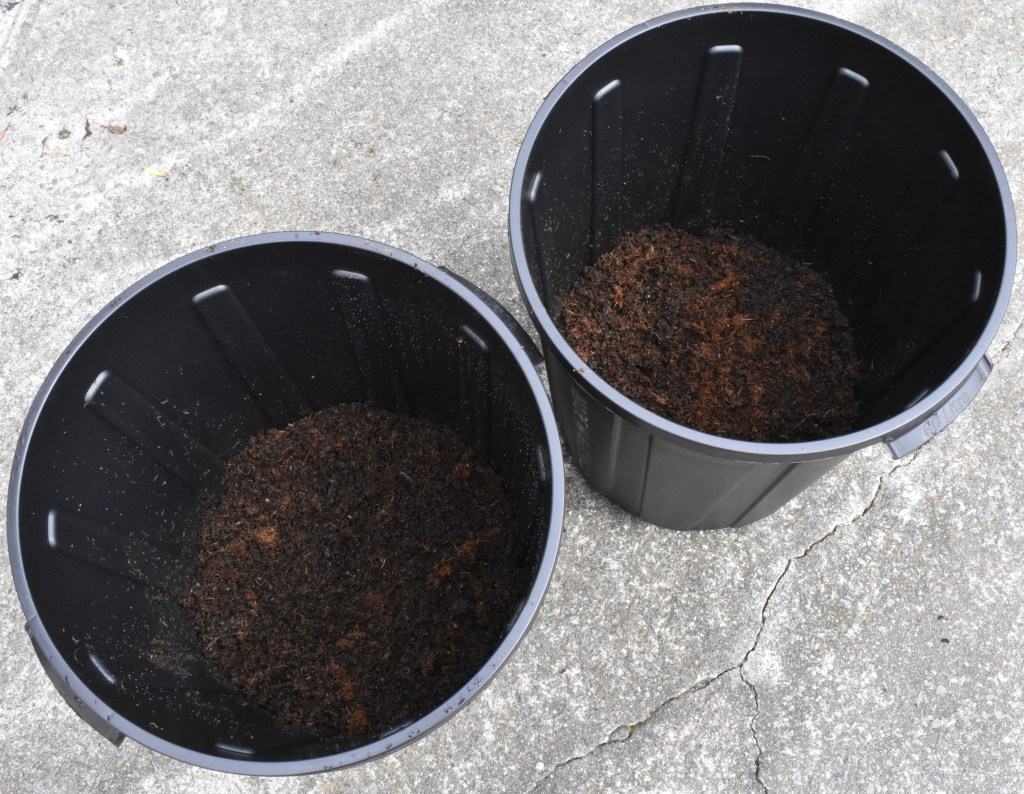
Then, you will need to fold some newspaper in half and layer a few sheets into the two bins you drilled holes into. Doing this will prevent the compost and dirt from falling through when filling them.
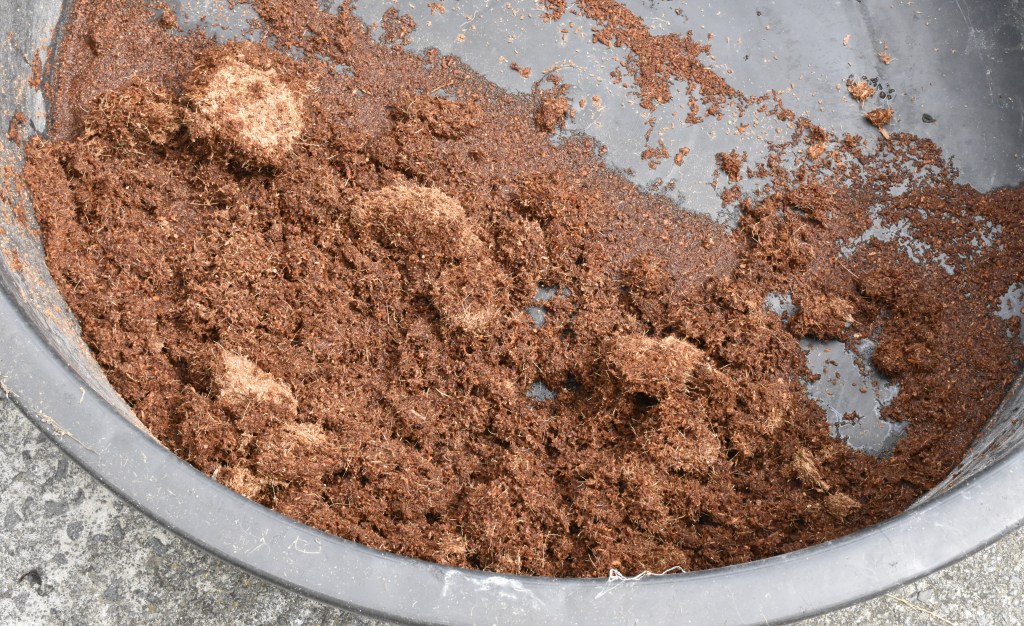
Once that’s done, combine the compost and potting mix with the coir. When mixed, divide them over the two bins you just lined with newspaper. I used 10 litres each of compost, potting mix, and half a coir brick. You may need more or less depending on the size of the container you end up deciding on. But it would be best to have at least one-quarter of your container filled with soil.
Next, if you haven’t already, figure out where you want to keep your worm farm once it’s completed. Try to look for shady areas that get partial sun. Place the third bin, or the one with the tap, there. I decided on a little easily accessible part of the garden near my main garden beds.
Now it’s time to add your new friends. Gently divide the box or bag of worms into the two bins filled with the compost and coir mix. Stack one container inside the other and then place them both into the third container or the one with the tap. Layer a sheet or two of newspaper on top of the soil in the topmost bin and finish it with the lid.
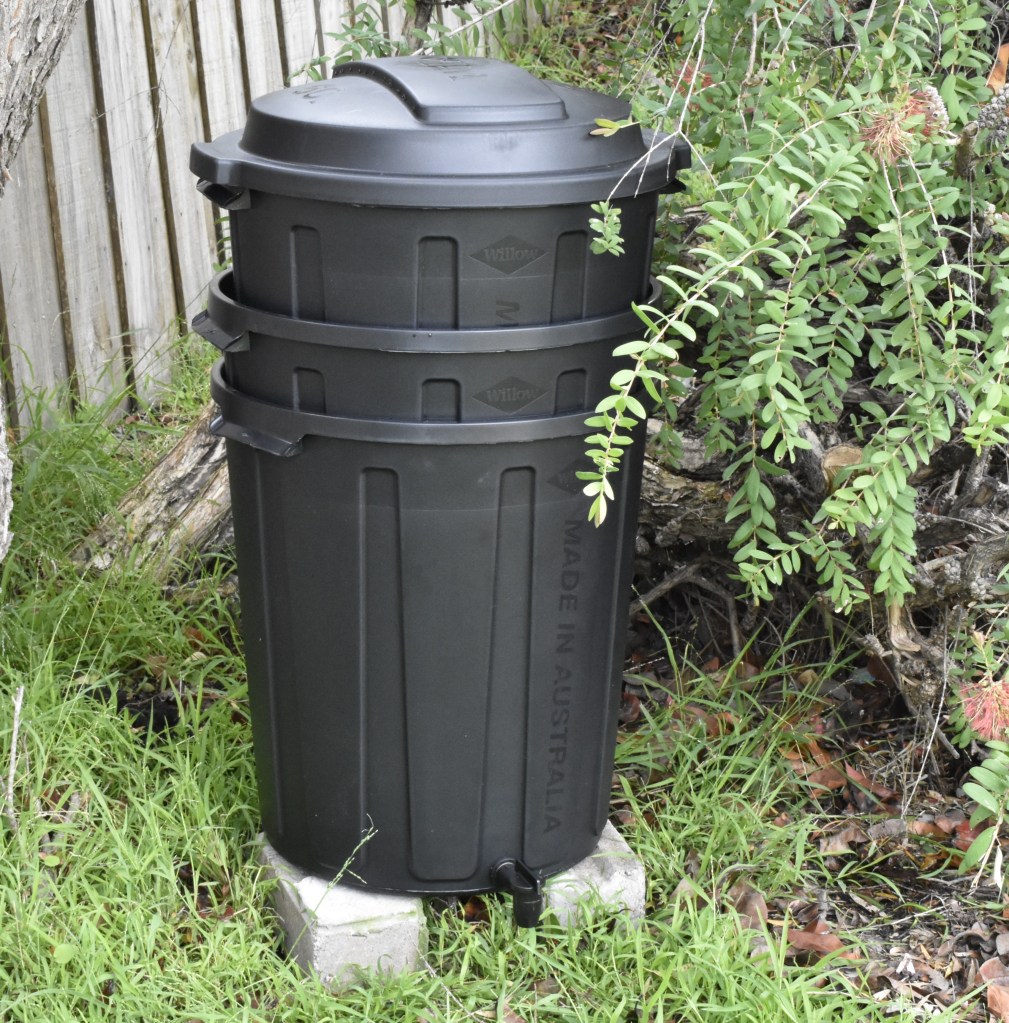
In the end, you should have something that looks a little like this. If you do, congratulations! You have just made yourself a worm farm.
Caring for your worms
Now that your farm is complete and stocked with worms, it’s understandable that you would want to start feeding them right away. However, at this point, you will need to give your worms a week to settle into their new environment before you can feed them your scraps. You must also be mindful that you don’t overwater your worm farm. If you are in a warmer climate, check your farm regularly to ensure it doesn’t dry out completely. The worms will be happier when the soil is damp, not saturated.
Your worms will also have a particular diet with strong likes and dislikes. Feeding them raw fruit and vegetable scraps, plain, unglossy paper, tea bags, natural strings, weeds, lawn clippings, and eggshells is a great way to keep them happy. Just remember that it has to be natural in origin.
Avoid feeding them meats, bones, dairy, bread, glossy or waxed paper, plastic or cling film, fats or oils, cooked foods, mouldy food, diseased plants or cuttings, garlic, onions, cat or dog poo, or excessive amounts of citrus fruits.
When that week finally passes, and you have your bowl of kitchen scraps ready to go, there is one more thing you could consider doing. Although not overly important, it does help, and that is to cut or chop your kitchen scraps a little smaller before adding them to the worm farm. If their food is in smaller pieces, the worms can process it much quicker. Which ultimately means you will get your castings and worm juice faster.
And there you have it—your very own worm farm. Very soon, you will be able to reap the rewards those little guys can offer. And for those of you who like fishing, once the population of worms is high enough, you will have an endless supply of bait for your next fishing trip.
In the coming week, I will start feeding my farm, and hopefully, in a short while, I will be able to start collecting and using the castings and juice. Of course, I will keep you updated on the worms’ progress, so keep an eye out in a month or so to see how it’s all going.
If you’ve been keeping worms for a while, what tips would you recommend for first-timers? Things you wish you had known back then or would have done differently knowing what you know now?
Anyway, that’s me for today. I hope you’ve enjoyed this post, as I had a lot of fun making it. Next week, I will start harvesting some of the produce from my garden, and I thought I would share a simple trick to preserve and store your freshly grown vegetables! Be sure to check it out.
Thanks for dropping by, and until next time, have yourself a good one, and I will catch you later.
