Hello and welcome back. As spring is just a couple of weeks away I thought it was about time to get my hands dirty and try to grow something. I have very little space to grow anything, literally a small corner of my dining table/desk. So because of this, I have set myself a couple of rules, as I want to show people that regardless of your space you can still manage to grow something. These rules are as follows,
- I’m going to do it in my tiny apartment. I have no outdoor space, no balcony or even a decent windowsill so as mentioned before everything I grow will be done on my dining table by the window.
- I will do this as cheaply as possible.
It has been some time since I have done anything garden-related I am looking forward to being able to have some plants to tend to again, even if it is just a couple of pots. Back in Australia, I used to have a large backyard where I had several garden beds and grew whatever I wanted. But during my time in Canada, I haven’t had the space or the ability to do anything. But now that I am in my own place and spring is just around the corner, I thought it would be the perfect opportunity to start a little herb garden.
The equipment used and cost
I decided I will use two types of containers, the first being your more traditional plastic pot. And for the second I used some old yoghurt and food containers. I went with the two types of containers because I wanted to use the traditional plastic pots as it is the first choice most people would make when growing something and for that reason, it should be included. Especially as I am giving an example of how much this setup would cost. But I want to add that if you do decide to use a plastic pot, please ask any friends or family who like to garden if they have any lying around as most gardeners will have a few somewhere that they would no doubt be happy for you to take some. Personally I prefer to use old food containers as they are just as easily sourced as plastic pots and they have the added advantage of being recyclable. If a container can hold dirt it can support a plant, and provided they are given a good clean, yoghurt tubs and produce trays can work really well. I have fond memories of the front steps at my Nan’s house, they were covered in pot plants of all sorts and every one of them was in either an old food container or an old cooking pot, it added lots of character to an already amazing garden.
Before we continue I have to add I am not paid, sponsored or affiliated with any brand so if you see a brand in these pictures it means nothing other than it is what I am using. Now as for the equipment I am using, all together I have,
- 1 18ltr bag of potting mix.
- 2 plastic pot saucers.
- 3 small plastic pots.
- 2 650g yoghurt pots.
- 1 deep food tray.
- 4 packets of seeds.
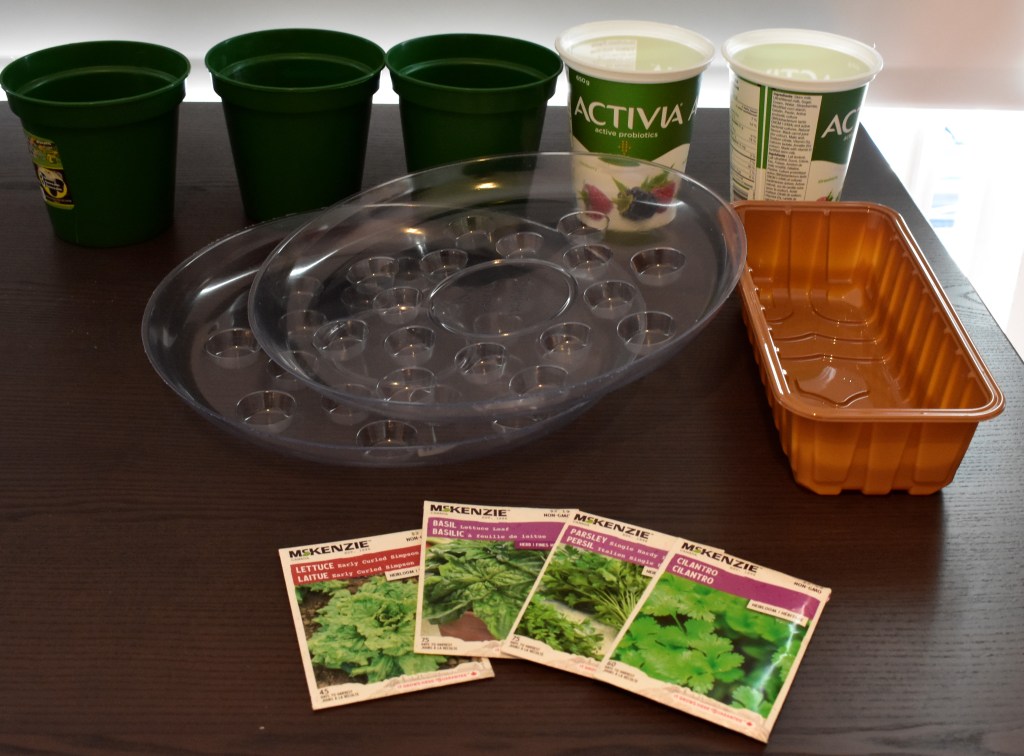
In total everything I purchased, minus the yoghurt pots came to just under $25. The three small plastic pots came in a set from my local dollar store and everything else came from a nearby hardware store. As far as the potting mix went I went with the largest bag at the cheapest price. There were plenty of other seed-raising mixes I could have got, but for the point of this demonstration, I went with the best value for money.
I chose to grow basil, coriander (cilantro) and flat-leaf parsley. I use these herbs a lot in my cooking so growing them means I no longer need to keep buying the overpriced fresh herbs from the supermarket, the fact that they are also easy to grow and don’t take up much space which is another plus. And for no real reason other than I wanted to try it, I picked out some heirloom lettuce seeds.
Getting your hands dirty or planting the seeds
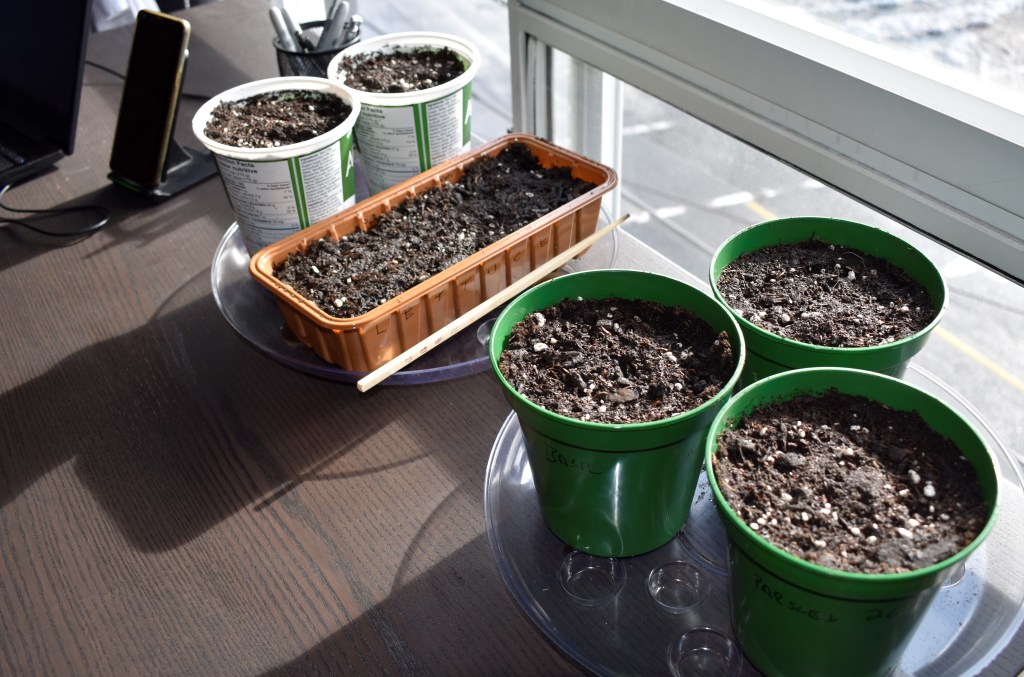
I started by carefully using a knife to poke holes in the bottom of the yoghurt tubs, these will allow the excess water to drain out. I then filled each of the pots and containers with potting mix and patted it down ensuring it was compacted and not sitting loose in the pot. I made sure that I left 2-3cm between the top of the potting mix and the rim of the pot. At this stage, it is always a good idea to have a look at the seed packet for directions on the different depths and spacing the seeds may require. So after doing that I used an old chopstick and made a little hole in the potting mix, roughly 1-2 cm in depth for the seeds. Carefully I dropped a seed into each of the holes and covered it over gently patting it down.
The next step is completely up to you but for me, it is a must. Using a marker I wrote on the pot what was planted inside and the date it was planted. If you don’t want to or can’t write on the pot, you could use an old paddle pop stick or you could cut up some old plastic containers into tags that you could write on. It doesn’t matter what you use, just as long as you have a way to know what you’ve planted and when you planted it. As I said you don’t have to do this but I find it is a great way to help stay organised and aware of what you have growing. Once the seeds were planted and the pot was tagged I gave them a good water and sat them on their trays in front of the window so they could enjoy the sun.
Once that was done I cleaned up my work area and put away the leftover potting mix and seeds. As mentioned earlier, in total I spent just under $25 for the seeds, potting mix, pots and pot saucers. So if you wanted to run out and buy everything you can easily see its rather inexpensive to get started with the basics, and if you recycled old food containers for pots or saucers you could save even more. With any luck in the coming weeks, I will be able to watch my little herb garden sprout and grow into something that I can get many uses from.
Now it was a far cry from the full day spent outside working in the garden that I am used to but I have to admit, these few pots and the excitement of being able to watch them grow is a great feeling to have again. And I highly recommend that if you have the means to grow something even if it’s as small as a succulent or two, having a plant in your home makes a big difference. In my next post, I will share some methods of caring for indoor pot plants, including how to deal with some common problems you may encounter and hopefully after that I will have an update on my herb garden.
So until next time, have a good one and catch you later.

Leave a comment